


Advanced Configuration and Management Guide
USING THE WEB MANAGEMENT INTERFACE
1. Log on to the device using a valid user name and password for read-write access. The System configuration
panel is displayed.
2. Click on the plus sign next to Configure in the tree view to expand the list of configuration options.
3. Click on the plus sign next to BGP in the tree view to expand the list of BGP option links.
4. Click on the General
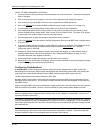
link to display the BGP configuration panel, shown in Figure 10.2 on page 10-8.
5. Select Disable or Enable next to Always Compare MED.
6. Click the Apply button to apply the changes to the device’s running-config file.
7. Select the Save
link at the bottom of the dialog. Select Yes when prompted to save the configuration change
to the startup-config file on the device’s flash memory.
Synchronizing Routes
By default, the routing switch does not wait until the IGPs in the local AS have fully exchanged route information
before BGP4 advertises the routes to its remote BGP4 neighbors. The routing switch advertises routes to its
remote BGP4 neighbors regardless of whether the routes are learned or have already been propagated
throughout the local AS.
If you want the routing switch to wait until the IGPs in the local AS have fully exchanged route information before
BGP4 advertises the routes to its remote BGP4 neighbors, enable synchronization.
To enable synchronization, use either of the following methods.
USING THE CLI
To enable synchronization, enter the following command:
HP9300(config-bgp-router)# synchronization
To disable synchronization again, enter the following command:
HP9300(config-bgp-router)# no synchronization
Syntax: [no] synchronization
USING THE WEB MANAGEMENT INTERFACE
1. Log on to the device using a valid user name and password for read-write access. The System configuration
panel is displayed.
2. Click on the plus sign next to Configure in the tree view to expand the list of configuration options.
3. Click on the plus sign next to BGP in the tree view to expand the list of BGP option links.
4. Click on the General
link to display the BGP configuration panel, shown in Figure 10.2 on page 10-8.
5. Select Disable or Enable next to Synchronization.
6. Click the Apply button to apply the changes to the device’s running-config file.
7. Select the Save
link at the bottom of the dialog. Select Yes when prompted to save the configuration change
to the startup-config file on the device’s flash memory.
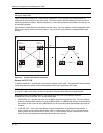
Automatically Summarizing Subnet Routes Into Class A, B, or C Networks
The auto summary feature summarizes the routes it redistributes from IGP to BGP4. The routing switch
summarizes subnets into their natural class A, B, or C networks. For example, if an AS contains subnets 1.1.0.0,
1.2.0.0, and 1.3.0.0 with the network mask 255.255.0.0, the auto summary feature summarizes the subnets in its
advertisements to BGP4 neighbors as 1.0.0.0/8.
The auto summary feature is disabled by default. If you want to enable the feature, use either of the following
methods.
10 - 32