


Advanced Configuration and Management Guide
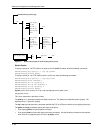
17. Click the checkbox next to In Filter, Out Filter, or next to both options to indicate the traffic direction to which
you are applying the policy.
• The In Filter option applies the policy to packets received in the port.
• The Out Filter option applies the policy to packets sent on the port.
• If you select both, the policy applies to traffic in both directions.
In this example, select Out Filter.
18. Enter the policy IDs in the Filter ID List field.
NOTE: The device applies the policies in the order you list them, so make sure you order them in such a
way that you receive the results you expect. Once a packet matches a policy, the device takes the action
specified in that policy and stops comparing the packet to the policies in the list.
19. Click the Add button to apply the change to the device’s running-config file.
20. Select the Save link at the bottom of the dialog, then select Yes when prompted to save the configuration
change to the startup-config file on the device’s flash memory.
NOTE: You also can access the dialog for saving configuration changes by clicking on Command in the tree
view, then clicking on
Save to Flash.
Switch
To assign a priority of 7 to FTP traffic on all ports on an HP 6208M-SX switch, perform the following steps:
1. Log on to the device using a valid user name and password for read-write access. The System configuration
dialog is displayed.
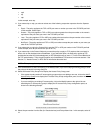
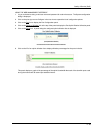
2. Select the Layer 4 QoS link to display the QoS panel.
3. Enter the ID for the policy in the ID field.
4. Select the Switch or Port radio button next to Scope to indicate whether the policy applies globally or only to
certain ports.
5. Select a QoS level from 0 – 7 from the QoS field’s pulldown menu. In this example, select 7.
6. Select the UDP or TCP radio button next to Protocol to specify the type of traffic to which the QoS policy
applies.
7. Select a well-known TCP or UDP port name (depending on whether you selected TCP or UDP) from the TCP/
UDP Port field’s pulldown list. To enter a port number instead, click on the User Define button to change the
field into an entry field, then enter the port number. For this example, select FTP.
8. Click the Add button to apply the change to the device’s running-config file.
9. If you selected Port in step 4, click on Port QoS to display the Port QoS panel. Otherwise, go to step 13.
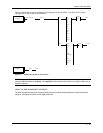
10. Select the port number from the Slot (for Chassis devices) and Port pulldown lists.
11. Enter the policy IDs in the QoS ID List field.
NOTE: The device applies the policies in the order you list them, so make sure you order them in such a
away that you receive the results you expect. Once a packet matches a policy, the device takes the action
specified in that policy and stops comparing the packet to the policies in the list.
12. Click the Add button to apply the change to the device’s running-config file.
13. Select the Save
link at the bottom of the dialog, then select Yes when prompted to save the configuration
change to the startup-config file on the device’s flash memory.
2 - 24