


Advanced Configuration and Management Guide
6. Enter the area ID in the Area ID field. The ID can be a number or an IP address.
7. Select NSSA by clicking on the radio button next to NSSA in the Type field.
8. Enter a cost in the Stub Cost field. This parameter is required. You can specify from 1 – 16777215. There is
no default.
9. Click the Add button to add the area.
10. Select the Save
link at the bottom of the dialog. Select Yes when prompted to save the configuration change
to the startup-config file on the device’s flash memory.
Configuring an Address Range for the NSSA
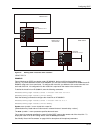
If you want the ABR that connects the NSSA to other areas to summarize the routes in the NSSA before
translating them into Type-5 LSAs and flooding them into the other areas, configure an address range. The ABR
creates an aggregate value based on the address range. The aggregate value becomes the address that the
ABR advertises instead of advertising the individual addresses represented by the aggregate. You can configure
up to 32 ranges in an OSPF area.
USING THE CLI
To configure an address range in NSSA 1.1.1.1, enter the following commands. This example assumes that you
have already configured NSSA 1.1.1.1.
HP9300(config)# router ospf
HP9300(config-ospf-router)# area 1.1.1.1 range 209.157.22.1 255.255.0.0
HP9300(config-ospf-router)# write memory
Syntax: area <num> | <ip-addr> range <ip-addr> <ip-mask>
The <num> | <ip-addr> parameter specifies the area number, which can be in IP address format.
The <ip-addr> parameter following range specifies the IP address portion of the range. The software compares
the address with the significant bits in the mask. All network addresses that match this comparison are
summarized in a single route advertised by the routing switch.
The <ip-mask> parameter specifies the portions of the IP address that a route must contain to be summarized in
the summary route. In the example above, all networks that begin with 209.157 are summarized into a single
route.
USING THE WEB MANAGEMENT INTERFACE
1. Log on to the device using a valid user name and password for read-write access.
2. If you have not already enabled OSPF, enable it by clicking on the Enable radio button next to OSPF on the
System configuration panel, then clicking Apply to apply the change.
3. Click on the plus sign next to Configure in the tree view to expand the list of configuration options.
4. Click on the plus sign next to OSPF in the tree view to expand the list of OSPF option links.
5. Click on the Area Range
link to display the OSPF Area Range configuration panel.
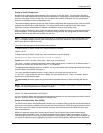
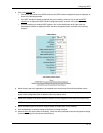
6. Click on the Add Area Range
link to display the following panel.
8 - 14