


Configuring BGP4
USING THE WEB MANAGEMENT INTERFACE
1. Log on to the device using a valid user name and password for read-write access. The System configuration
panel is displayed.
2. Select the Enable radio button next to BGP.
3. Enter the local AS number in the Local AS field.
4. Click the Apply button to apply the changes to the device’s running-config file.
5. Select the Save
link at the bottom of the dialog. Select Yes when prompted to save the configuration change
to the startup-config file on the device’s flash memory.
Adding a Loopback Interface
You can configure the routing switch to use a loopback interface instead of a specific port to communicate with a
BGP4 neighbor. A loopback interface adds stability to the network by working around route flap problems that can
occur due to unstable links between the routing switch and its neighbors.
Loopback interfaces are always up, regardless of the states of physical interfaces. Loopback interfaces are
especially useful for IBGP neighbors (neighbors in the same AS) that are multiple hops away from the routing
switch. When you configure a BGP4 neighbor on the routing switch, you can specify whether the routing switch
uses the loopback interface to communicate with the neighbor. As long as a path exists between the routing
switch and its neighbor, BGP4 information can be exchanged. The BGP4 session is not associated with a specific
link but instead is associated with the virtual interfaces.
You can add up to 24 IP addresses to each loopback interface.
NOTE: If you configure the HP routing switch to use a loopback interface to communicate with a BGP4 neighbor,
the peer IP address on the remote router pointing to your loopback address must be configured.
To add a loopback interface, use one of the following methods.
USING THE CLI
To add a loopback interface, enter commands such as those shown in the following example:
HP9300(config-bgp-router)# exit
HP9300(config)# int loopback 1
HP9300(config-lbif-1)# ip address 10.0.0.1/24
Syntax: interface loopback <num>
The <num> value can be from 1 – 8 on the HP 9308M, HP 9304M, and HP 6308M-SX. The value can be from
1 – 4 on the HP6308.
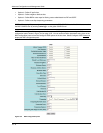
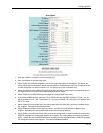
USING THE WEB MANAGEMENT INTERFACE
1. Log on to the device using a valid user name and password for read-write access. The System configuration
panel is displayed.
2. Select the IP Address
link to display a table listing the configured IP addresses.
3. Select the Loop Back link.
NOTE: If the device already has loopback interfaces, a table listing the interfaces is displayed. Click the
Modify button to the right of the row describing an interface to change its configuration, or click the Add Loop
Back link to display the Router Loop Back configuration panel.
4. Select the loopback interface number from the Loopback field’s pulldown menu. You can select from 1 – 8.
5. Select the status. The interface is enabled by default.
6. Click Add to add the new interface.
10 - 13