


Advanced Configuration and Management Guide
Syntax: deny | permit redistribute <filter-num> all | bgp | connected | rip | static
[address <ip-addr> <ip-mask> [match-metric <value> [set-metric <value>]]]
EXAMPLE:
To redistribute RIP, static, and BGP4 routes into OSPF, enter the following commands on the routing switch
acting as an ASBR:
HP9300ASBR(config)# router ospf
HP9300ASBR(config-ospf-router)# permit redistribute 1 all
HP9300ASBR(config-ospf-router)# write memory
Syntax: deny | permit redistribute <filter-num> all | bgp | connected | rip | static
address <ip-addr> <ip-mask>
[match-metric <value> | set-metric <value>]
NOTE: Redistribution is permitted for all routes by default, so the permit redistribute 1 all command in the
example above is shown for clarity but is not required.
You also have the option of specifying import of just OSPF, BGP4, or static routes, as well as specifying that only
routes for a specific network or with a specific cost (metric) be imported, as shown in the command syntax below:
Syntax: [no] redistribution bgp | connected | rip | static
For example, to enable redistribution of RIP and static IP routes into OSPF, enter the following commands.
HP9300(config)# router ospf
HP9300(config-ospf-router)# redistribution rip
HP9300(config-ospf-router)# redistribution static
HP9300(config-ospf-router)# write memory
NOTE: The redistribution command does not perform the same function as the permit redistribute and deny
redistribute commands. The redistribute commands allow you to control redistribution of routes by filtering on
the IP address and network mask of a route. The redistribution commands enable redistribution for routes of
specific types (static, directly connected, and so on). Configure all your redistribution filters before enabling
redistribution.
NOTE: Do not enable redistribution until you have configured the redistribution filters. If you enable
redistribution before you configure the redistribution filters, the filters will not take affect and all routes will be
distributed.
USING THE WEB MANAGEMENT INTERFACE
1. Log on to the device using a valid user name and password for read-write access. The System configuration
panel is displayed.
2. Click on the plus sign next to Configure in the tree view to expand the list of configuration options.
3. Click on the plus sign next to OSPF in the tree view to expand the list of OSPF option links.
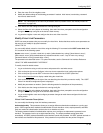
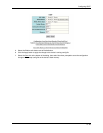
4. Click on the Redistribution Filter
link.
• If the device does not have any OSPF redistribution filters, the OSPF Redistribution Filter configuration
panel is displayed, as shown in the following example.
• If an OSPF redistribution filter is already configured and you are adding a new one, click on the Add
Redistribution Filter link to display the OSPF Redistribution Filter configuration panel, as shown in the
following example.
5. If you are modifying an existing OSPF redistribution filter, click on the Modify button to the right of the row
describing the filter to display the OSPF Redistribution Filter configuration panel, as shown in the following
example.
8 - 26