


Installation and Getting Started Guide
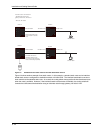
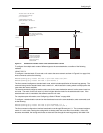
The following commands configure static IP routes to the same destination, but with different metrics. The route
with the lowest metric is used by default. The other routes are backups in case the first route becomes unavailable.
The routing switch uses the route with the lowest metric if the route is available.
HP9300(config)# ip route 192.128.2.69 255.255.255.0 209.157.22.1
HP9300(config)# ip route 192.128.2.69 255.255.255.0 192.111.10.1 2
HP9300(config)# ip route 192.128.2.69 255.255.255.0 201.1.1.1 3
In this example, each static route has a different metric. The metric is not specified for the first route, so the default
(1) is used. A metric is specified for the second and third static IP routes. The second route has a metric of two
and the third route has a metric of 3. Thus, the second route is used only of the first route (which has a metric
of 1) becomes unavailable. Likewise, the third route is used only if the first and second routes (which have lower
metrics) are both unavailable.
For complete syntax information, see “Configuring a Static IP Route” on page 6-38.
USING THE WEB MANAGEMENT INTERFACE
1. Log on to the device using a valid user name and password for read-write access. The System configuration
panel is displayed.
2. Click on the plus sign next to Configure in the tree view to expand the list of configuration options.
3. Click on the plus sign next to IP in the tree view to expand the list of IP option links.
4. Click on the General
link to display the IP configuration panel.
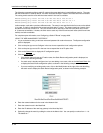
5. Click the Static Route
link.
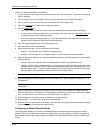
• If the device does not have any IP static routes, the Static Route configuration panel is displayed, as
shown in the following example.
• If a static route is already configured and you are adding a new route, click on the Add Static Route link
to display the Static Route configuration panel, as shown in the following example.
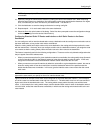
• If you are modifying an existing static route, click on the Modify button to the right of the row describing
the static route to display the Static Route configuration panel, as shown in the following example.
6. Enter the network address for the route in the Network field.
7. Enter the network mask in the Mask field.
8. Enter the IP address of the next hop gateway in the Next Hop field.
9. Optionally change the metric by editing the value in the Metric field. You can specify a number from 1 – 16.
The default is 1.
6 - 42