


Advanced Configuration and Management Guide
The <num> indicates the number of OSPF routes allowed and can be from 4000 – 32000. The change takes
effect after the routing switch is rebooted.
USING THE WEB MANAGEMENT INTERFACE
You cannot modify the maximum number of OSPF routes using the Web management interface.
Modify LSDB Limits
NOTE: This section applies only to devices that are running software earlier than release 07.1.10. See
“Dynamic OSPF Memory” on page 8-6.
On routing switches with 32MB or greater memory, you can modify the number of link-state advertisements
(LSAs) that the routing switch allows before a database overflow condition is declared on the system. These
parameters are part of the routing switch’s compliance with RFC 1765.
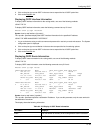
The following table lists the types of LSAs for which you can configure the table sizes, the default number of
entries the tables can hold, and the range of maximum values you can specify. You cannot configure the LSA
tables globally; you must configure them for individual LSA types. Make sure you save the running-config file and
reload after changing a table size. The change does not take effect until you reload or reboot.
Table 8.1: Configurable LSA Table Sizes
LSA Type Default Maximum Number of
Entries
Range of Values
External (type 5) 2000 500 – 8000
Network (type 2) 2000 200 – 2000
Router (type 1) 2200 200 – 2200
Summary (type 3 and type 4) 2000 500 – 8000 (NA)
500 – 18000 (HP 9304M or HP
9308M,HP 6308M-SX)
USING THE CLI
To change the maximum number of summary LSA entries from 2000 to 18000, enter the following commands:
HP9300(config-ospf-router)# maximum-number-of-lsa summary 18000
HP9300(config-ospf-router)# write memory
HP9300(config-ospf-router)# exit
Syntax: maximum-number-of-lsa external | network | router | summary <value>
USING THE WEB MANAGEMENT INTERFACE
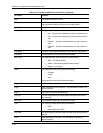
To modify the number of IP OSPF external link state advertisements:
1. Log on to the device using a valid user name and password for read-write access. The System configuration
panel is displayed.
2. Click on the plus sign next to Configure in the tree view to expand the list of configuration options.
3. Click on the plus sign next to OSPF in the tree view to expand the list of OSPF option links.
4. Click on the General
link to display the OSPF configuration panel.
5. Enter a value from 500 – 8000 in the External LSDB Limit field.
6. Click the Apply button to save the change to the device’s running-config file.
8 - 38