


4: Quick Setup
SLB™ Branch Office Manager User Guide 32
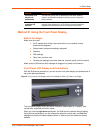
Note: If you have connected Eth1 to the network, and Eth1 is able to acquire
an IP address through DHCP, this IP address displays, followed by the letter
[D]. Otherwise, the IP address displays as all zeros (000.000.000.000).
2. Press the Enter button on the keypad to enter edit mode. A cursor displays below
one character of the existing IP address setting.
3. To enter values:
Use the left or right arrow to move the cursor to the left or to the right position.
Use the up or down arrow to increment or decrement the numerical value.
4. When you have the IP address as you want it, press Enter to exit edit mode, and
then press the down arrow button. The Subnet Mask parameter displays.
Note: You must edit the IP address and the Subnet Mask together for a valid
IP address combination.
5. To save your entries for one or more parameters in the group, press the right
arrow button. The Save Settings? Yes/No prompt displays.
Note: If the prompt does not display, make sure you are no longer in edit
mode.
6. Use the left/right arrow buttons to select Yes, and press the Enter button.
7. Press the right arrow button to move to the next option, Console Settings.
8. Repeat steps 2-7 for each setting.
9. Press the right arrow button to move to the next option, Date/Time Settings, and
click Enter to edit the time zone.
a) To enter a US time zone, use the up/down arrow buttons to scroll through the
US time zones, and then press Enter to select the correct one.
b) To enter a time zone outside the US, press the left arrow button to move up to
the top level of time zones. Press the up/down arrow button to scroll
through the top level.
A time zone with a trailing slash (such as Africa/) has sub-time zones. Use the
right arrow button to select the Africa time zones, and then the up/down
arrows to scroll through them.
Press Enter to select the correct time zone. To move back to the top-level time
zone at any time, press the left arrow.
10. To save your entries, press the right arrow button. The Save Settings? Yes/No
prompt displays.
Note: If the prompt does not display, make sure you are no longer in edit
mode.
11. Use the left/right arrow buttons to select Yes, and press the Enter button.
12. To review the saved settings, press the up or down arrows to step through the
current settings.
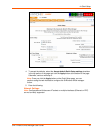
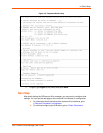
When you are done, the front panel returns to the clock display. The network port
resets to the new settings, and you can connect to your IP network for further
administration. You should be able to Telnet or SSH to the SLB branch office
manager through your network connection, or access the web interface through a
web browser.