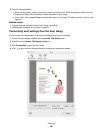
3 From the “Send scanned image to” pop-up menu, scroll down to the bottom of the list, and choose Customize
list. The Customize list dialog appears, showing all available applications.
To add an application to the list:
1 Click +.
2 Click Browse to navigate through the list of applications available on the computer. Click the application that
you want to add to the Available Applications list.
3 Click OK.
4 From the File Type pop-up menu, choose the type of file you want to send to your chosen application.
5 Edit the display name if desired. This is the name that will appear in the “Send scanned image to” pop-up menu.
6 Click OK.
To remove an application from the list:
1 From the list of applications, choose the application you want to remove.
2 Click -.
3 If you are sure, click OK when prompted. Otherwise, click Cancel.
To modify an application in the list:
1 From the list of applications, choose the application you want to modify.
2 Click Edit.
3 Edit the name to be displayed in the “Send scanned image to” pop-up menu.
• Click Browse to choose a new path to the application.
• From the File Type pop-up menu, choose the type of file you want to send to this application. You can choose
only one type of file.
• Click OK.
Related topics:
• “Selecting the All-In-One Center Preferences setting” on page 51
Adjusting color settings when scanning
You can manually adjust the color settings for optimum color output.
1 From the Finder desktop, double-click the Lexmark 7500 Series folder.
2 Double-click the Lexmark 7500 Series Center icon.
3 From the All-In-One Center, click Preview/Edit to open the Scan dialog.
4 From the Scan dialog, click to open the Scan Settings drawer.
5 From the Settings tab:
• Select a preset scan setting corresponding to your document.
• If you are not satisfied with a preset setting, customize the scan settings by adjusting color depth and
resolution, and choosing a descreening option if you need to remove wavy patterns from images scanned
from magazines or newspapers.
• Reduce background noise, if necessary. Select Reduce Background Noise, and move the slider to adjust
the level of noise reduction.
Scanning
47


