


Related topics:
• “Loading original documents on the scanner glass” on page 34
Scanning a text-only document
1 Make sure the printer is connected to a computer, and both the printer and the computer are on.
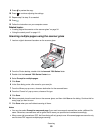
2 Load an original document facedown on the scanner glass.
3 From the Finder desktop, double-click the Lexmark 7500 Series folder.
4 Double-click the Lexmark 7500 Series Center icon.
5 From the “What is being scanned?” menu, choose Black Text.
6 Adjust the settings as needed.
7 Click Scan.
Related topics:
• “Loading original documents on the scanner glass” on page 34
Scanning a text and graphics document
1 Make sure the printer is connected to a computer, and both the printer and the computer are on.
2 Load an original document facedown on the scanner glass.
3 From the Finder desktop, double-click the Lexmark 7500 Series folder.
4 Double-click the Lexmark 7500 Series Center icon.
5 From the “What is being scanned?” menu, choose Mixed Graphics and Text.
6 Adjust the settings as needed.
7 Click Scan.
Related topics:
• “Loading original documents on the scanner glass” on page 34
Scanning an item for Web page viewing
1 Make sure the printer is connected to a computer, and both the printer and the computer are on.
2 Load an original document facedown on the scanner glass.
3 From the Finder desktop, double-click the Lexmark 7500 Series folder.
4 Double-click the Lexmark 7500 Series Center icon.
5 From the “How will the scanned image be used?” pop-up menu, choose To be viewed on monitor/web
page.
6 Adjust the settings as needed.
7 Click Scan.
Related topics:
• “Loading original documents on the scanner glass” on page 34
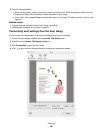
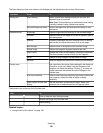
Scanning
54