


7-5
Cisco MGX 8220 Installation and Configuration
Release 5.0, Part Number 78-6430-03 Rev. D0, November 2003
Chapter
Rack-Mounting the MGX 8220 Units
Unpacking Each Container
Use the following steps to unpack each container.
Step 1 Move the container to the area where it is to be installed.
Step 2 Use a knife to open the cardboard container.
Step 3 Remove any foam packaging.
Step 4 Lift the module out of the container.
Step 5 Remove the anti-static bag surrounding the module.
Step 6 Remove any accessory hardware and set it aside for future reference.
Step 7 Save the packing materials until the installation is complete.
Parts Checklist
Before proceeding with the installation, use the parts checklist to verify that all the parts you ordered
are present and in good condition.
Plug-in cards can be shipped already installed in the shelf or under separate cover. The exact number of
cards will vary from site to site, depending on the selected configuration. The MGX 8220 shelf is
shipped with all unused front and back slots covered with inserts, which prevent radio frequency
emissions and ensure proper air flow through the shelf. The unit must not be operated with any unused
slots left uncovered.
Note An inventory of the installed cards is taped to the MGX 8220 shelf showing the serial number, the
revision number, and the slot number for each card. After verifying the cards, store the inventory for
future reference.
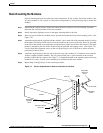
Rack-Mounting the MGX 8220 Units
The following sections detail how to rack-mount MGX 8220:
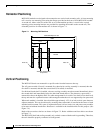
• Horizontal Positioning, page 7-6
• Vertical Positioning, page 7-6
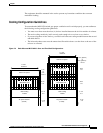
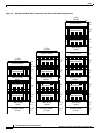
• Cooling Configuration Guidelines, page 7-7
• Rack-Mounting the Modules, page 7-9
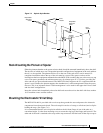
• Rack-Mounting the Plenum or Spacer, page 7-11
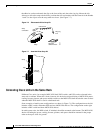
• Mounting the Electrostatic Wrist Strap, page 7-11
• Colocating Cisco Units in the Same Rack, page 7-12