


1-18
Cisco VISM Installation and Configuration Guide
Release 3.0, Part Number OL-2521-01 Rev. D0, June 2004
Chapter 1 Overview of the VISM and VISM-PR Cards
Installing VISM Hardware and Software
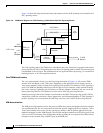
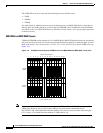
Step 3 Pull both of the extractor levers out to the horizontal position.
This action starts the removal of the card.
Step 4 Gently pull the card out of the chassis.
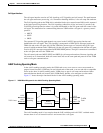
Applying Power to the VISM Card
You apply power to a VISM card by installing it in an already running MGX 8000 Series platform, or by
applying power to a chassis that has a previously installed VISM card. When power is applied, the VISM
card performs extensive testing and initialization functions. If the card has already been configured, the
initialization downloads the configuration data from the disk on the PXM. This process takes
approximately two minutes, during which the LED indicator blinks. When the Active LED becomes
solid green, the card is in the Active state and is ready to be configured (if necessary) and able to process
data.
Installing VISM Software Upgrades
VISM Release 3.0 provides a graceful upgrade procedure from Release 1.5 and higher. The existing
VISM configuration is preserved throughout the upgrade procedure, provided that the following
conditions are met:
• The Cisco MGX 8000 Series platform must be configured with at least two VISM cards in a
redundant configuration. Refer to the add redundancy, addred, command in the Cisco MGX 8850,
MGX 8250, and MGX 8230 command reference guides for details.
• The VISM cards must be running VISM 2.0 and be configured to the desired configuration.
• The VISM Release 3.0 software must have been already downloaded to the Cisco MGX shelf. Refer
to Release Notes for Cisco Voice Interworking Services Module Release 3.0(0) for details.
• Cisco recommends an upgrade in the backup boot to version 3.0.
Complete the following steps to upgrade the VISM software. In the following procedure, old-rev refers
to the firmware before the upgrade (2.0) and new-rev refers to the firmware after the upgrade (3.0).
Note If the VISM card you are upgrading is part of a nonredundant configuration, complete Step 1 to
Step 4 only.
Step 1 Log in to the active PXM card (slot 7 or 8).
Step 2 Save the existing configuration as a contingency plan by entering:
savesmcnf <SM slot#>
where:
SM slot# is the slot number of the active VISM card.
This command saves the existing configuration to the C:\CNF directory. This file can be used during the
downgrade procedure, if necessary.