


1-22
Cisco VISM Installation and Configuration Guide
Release 3.0, Part Number OL-2521-01 Rev. D0, June 2004
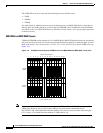
Chapter 1 Overview of the VISM and VISM-PR Cards
Software Upgrades
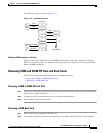
This command causes the secondary VISM or VISM-PR card to reset and come up in the standby state,
running the new-rev firmware. The primary VISM or VISM-PR card is unaffected by this command.
Step 4 Execute the PXM newrev command:
newrev sm <SM slot#> <new-rev>
where:
SM slot# is the slot number of the primary VISM or VISM-PR card and new-rev is the filename of the
new firmware.
This command causes the primary VISM or VISM-PR card to reset and the secondary VISM or
VISM-PR card to become active and running the new-rev firmware.
Step 5 Execute the PXM commit command:
commit sm <SM slot#> <new-rev>
where:
SM slot# is the slot number of the primary VISM or VISM-PR card and new-rev is the filename of the
new firmware.
The two VISM or VISM-PR cards are now back to their original condition except that both cards are
now running the new-rev firmware.
Step 6 Log in to the active VISM or VISM-PR card and use the display commands (for example, dspendpts,
dspcasvar, and so forth) to confirm that the configuration has been preserved through the upgrade
process.
Note For more than one primary VISM or VISM-PR card in a redundancy group, ensure that the secondary
card is in the standby state and repeat Step 4 and Step 5 for each VISM card in the redundancy group.
It is also recommended that you perform the following verifications:
• Make minor modifications to the configuration.
• Check that the changes have been executed correctly.
• Change the configuration back again.
Note If the VISM or VISM-PR card is not part of a redundancy group, complete Step 1 to Step 3.
For more information about the VISM and VISM-PR card specifications, see “VISM and
VISM-PR—3.0 Specifications” section on page B-1.