


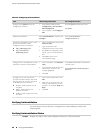

Table 42: Configuring Autoinstallation
CLI Configuration EditorJ-Web Configuration EditorTask
From the [edit] hierarchy level, enter
edit system
1.
In the J-Web interface, select
Configuration>View and Edit>
Edit Configuration.
2.
Next to System, click Configure or
Edit.
Navigate to the System level in the
configuration hierarchy.
Enter set autoinstallation
configuration-servers url
Select Autoinstallation, and then click
Configure.
Enable autoinstallation.
1.
Next to Configuration servers, click
Add new entry.
2.
Type the location of the
configuration server in the Url box.
3.
If a password is required for server
access, type it into the Password
box.
4.
Click OK to return to the
Autoinstallation page.
Specify the URL address of one or more
servers from which to obtain
configuration files. For example:
■
tftp://tftpconfig.sp.com
■
ftp://user:password
@sftpconfig.sp.com
To set BOOTP and RARP on an Ethernet
interface, enter
set autoinstallation interfaces ge-0/0/0
bootp rarp
1.
Next to Interfaces, click Add new
entry.
2.
Type the name of the interface into
the Interface name box—for
example, ge-0/0/0.
3.
Click OK.
Configure one or more Ethernet or serial
interfaces to perform autoinstallation.
1.
Next to the interface name, click
Edit.
2.
Select one or two protocols to be
used by autoinstallation over the
interface—for example, Bootp and
Rarp.
3.
Click OK.
Configure one or two procurement
protocols for each interface. The router
uses the protocols to send a request for
an IP address for the interface.
■
BOOTP—Sends requests over all
interfaces.
■
RARP—Sends requests over
Ethernet interfaces.
■
SLARP—Sends requests over serial
interfaces.
Verifying Autoinstallation
To verify that a Services Router is configured for autoinstallation, perform the
following task.
Verifying Autoinstallation Status
Purpose Display the status of the autoinstallation feature on a Services Router.
86 ■ Verifying Autoinstallation
J-series™ Services Router Administration Guide