


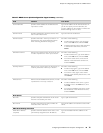
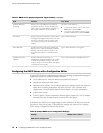

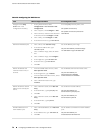
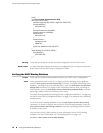


Table 39: Configuring the DHCP Server (continued)
CLI Configuration EditorJ-Web Configuration EditorTask
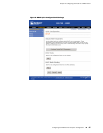
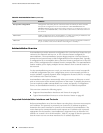
Set the DNS server IP address:
set pool 192.168.2.0/24
name-server 192.168.10.2
1.
Next to Name server, click Add new
entry.
2.
In the Address box, type 192.168.10.2.
3.
Click OK.
Define a DNS server.
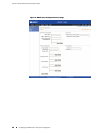
Set the router solicitation IP address:
set pool 192.168.2.0/24 option 32
ip-address 192.168.2.33
1.
Next to Option, click Add new entry.
2.
In the Option identifier code box, type 32.
3.
From the Option type choice list, select
Ip address.
4.
In the Ip address box, type 192.168.2.33.
5.
Click OK twice.
Define DHCP
option 32—the router
solicitation address option.
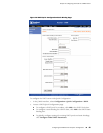
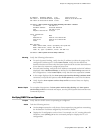
Associate a fixed IP address with the MAC
address of the client:
set static-binding 01:03:05:07:09:0B
fixed-address 192.168.2.50
1.
Next to Static binding, click Add new
entry.
2.
In the Mac address box, type
01:03:05:07:09:0B.
3.
Next to Fixed address, click Add new
entry.
4.
In the Address box, type 192.168.2.50.
5.
Click OK until you return to the
Configuration page.
Assign a static IP address
of 192.168.2.50 to MAC
address
01:03:05:07:09:0B.
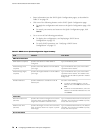
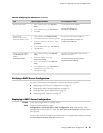
Verifying a DHCP Server Configuration
To verify a DHCP server configuration, perform the following tasks:
■ Displaying a DHCP Server Configuration on page 75
■ Verifying the DHCP Binding Database on page 76
■ Verifying DHCP Server Operation on page 77
■ Displaying DHCP Statistics on page 79
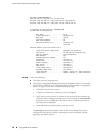
Displaying a DHCP Server Configuration
Purpose Verify the configuration of a DHCP server.
Action From the J-Web interface, select
Configuration>View and Edit>View Configuration Text. Alternatively, from
configuration mode in the CLI, enter the show system services dhcp command from
the top level.
You can also view the IP address pool from the CLI in operational mode by entering
the show system services dhcp pool command.
Verifying a DHCP Server Configuration ■ 75
Chapter 4: Configuring the Router as a DHCP Server