


Adding New Users
You can use the Users Quick Configuration page for user information to add new
users to a Services Router. For each account, you define a login name and password
for the user and specify a login class for access privileges.
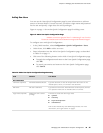
Figure 4 on page 11 shows the Quick Configuration page for adding a user.
Figure 4: Add a User Quick Configuration Page
ERROR: Unresolved graphic fileref="s020244.gif" not found in
"\\teamsite1\default\main\TechPubsWorkInProgress\STAGING\images\".
To configure users with Quick Configuration:
1. In the J-Web interface, select Configuration>Quick Configuration>Users.
2. Under Users, click Add to add a new user.
3. Enter information into the Add a User Quick Configuration page, as described
in Table 10 on page 11.
4. Click one of the following buttons on the Add a User Quick Configuration page:
■ To apply the configuration and return to the Users Quick Configuration page,
click OK.
■ To cancel your entries and return to the Users Quick Configuration page,
click Cancel.
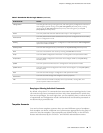
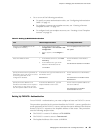
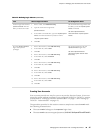
Table 10: Add a User Quick Configuration Page Summary
Your ActionFunctionField
User Information
Type the username. It must be unique within the router. Do not
include spaces, colons, or commas in the username.
Name that identifies the user.Username (required)
Type the user's full name. If the full name contains spaces, enclose
it in quotation marks. Do not include colons or commas.
The user's full name.Full Name
From the list, select the user's login class:
■
operator
■
read-only
■
super-user/superuser
■
unauthorized
This list also includes any user-defined login classes. For more
information, see “Login Classes” on page 5.
Defines the user's access
privilege.
Login Class (required)
Managing User Authentication with Quick Configuration ■ 11
Chapter 1: Managing User Authentication and Access