


Table 134: Enabling Packet Capture
CLI Configuration EditorJ-Web Configuration EditorTask
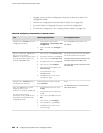
From the [edit] hierarchy level, enter
edit forwarding-options
1.
In the J-Web interface, select
Configuration>View and Edit>Edit
Configuration.
2.
Next to Forwarding options, click
Configure or Edit.
3.
Next to Scripts, click Configure or
Edit.
4.
Next to Commits, click Configure or
Edit.
In the configuration editor hierarchy,
select Forwarding options.
Navigate to the Forwarding options
level in the configuration hierarchy.
Enter
set packet-capture maximum-capture-size
500
1.
From the Sampling or packet capture
list, select Packet capture.
2.
Next to Packet capture, click
Configure.
3.
In the Maximum capture size box,
type 500.
Specify in bytes the maximum size
of each packet to capture in each
file—for example, 500. The range is
between 68 and 1500, and the
default is 68 bytes.
Enter
set packet-capture file filename pcap-file
In the Filename box, type pcap-file.
Specify the target filename for the
packet capture file—for example,
pcap-file. For each physical interface,
the interface name is automatically
suffixed to the filename—for
example, pcap-file.fe-0.0.1.
(See the interface naming
conventions in the J-series Services
Router Basic LAN and WAN Access
Configuration Guide.)
Enter
set packet-capture file files 100
In the Files box, type 100.
Specify the maximum number of files
to capture—for example, 100. The
range is between 2 and 10,000, and
the default is 10 files.
Enter
set packet-capture file size 1024
In the Size box, type 1024.
Specify the maximum size of each
file in bytes—for example, 1024. The
range is between 1,024 and
104,857,600, and the default is
512,000 bytes.
Enter
set packet-capture file world-readable
1.
Next to World readable, select Yes.
2.
Click OK.
Specify if all users have permission
to read the packet capture files.
258 ■ Configuring Packet Capture with a Configuration Editor
J-series™ Services Router Administration Guide