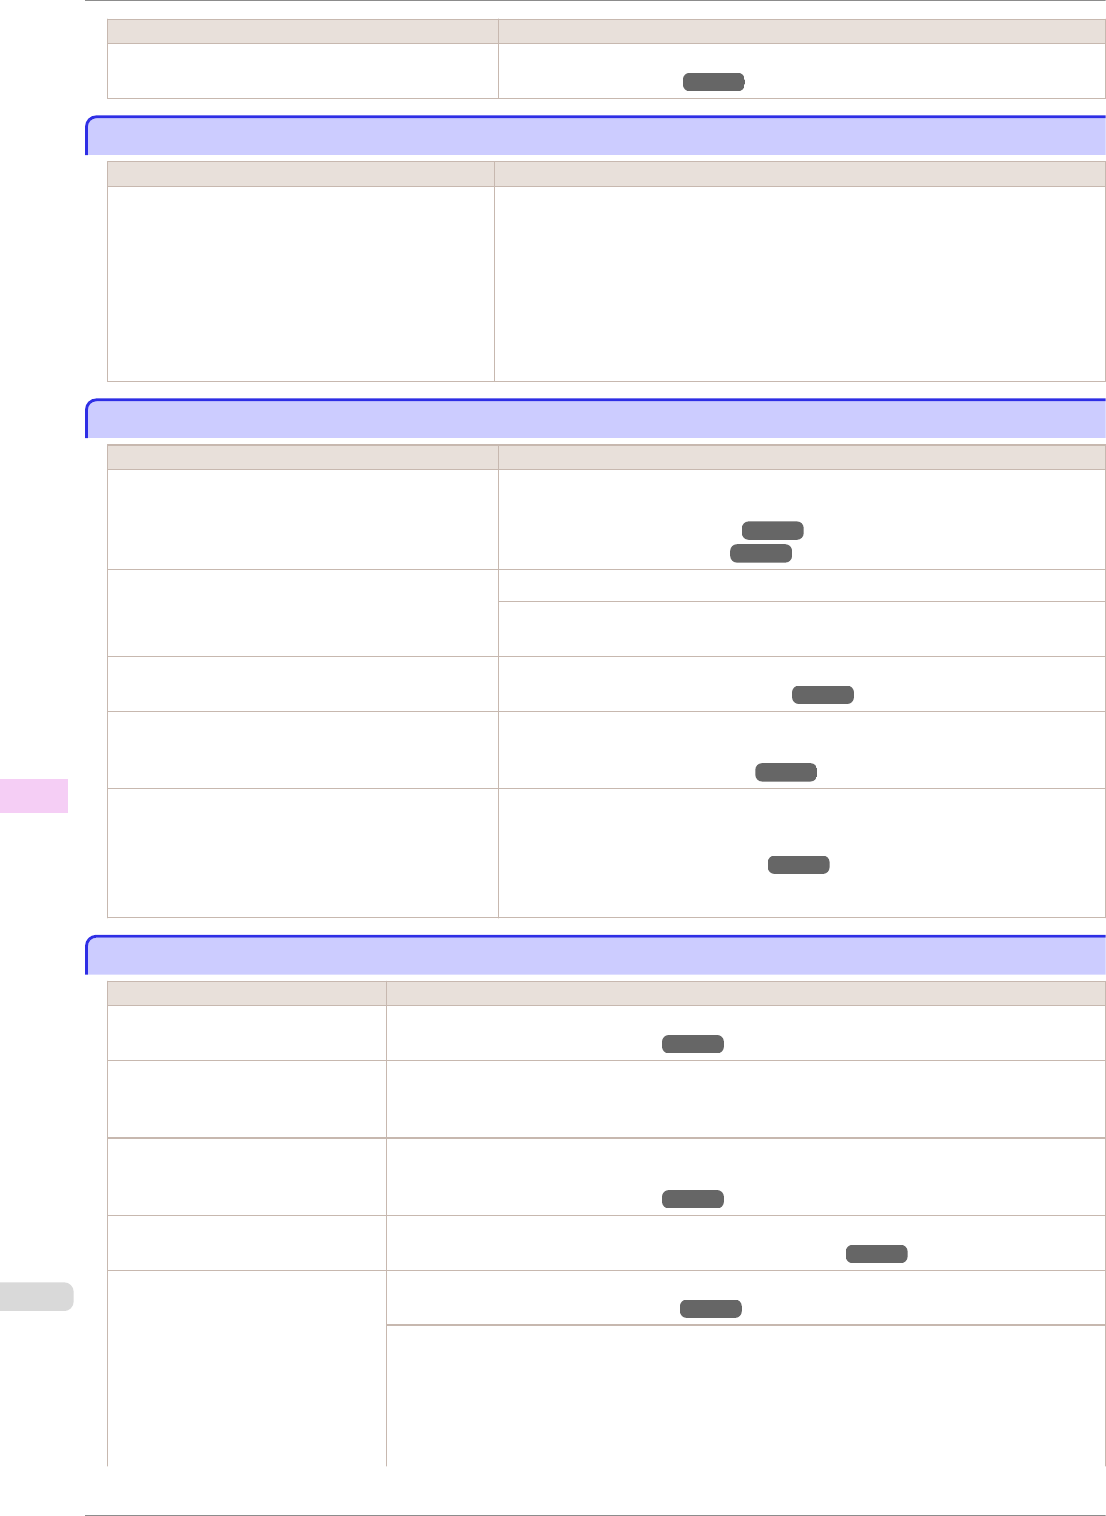
Cause Corrective Action
BordlessOversize is set to Standard in the Con-
trol Panel menu.
Set BordlessOversize to Little in the Control Panel menu.
(See "Menu Settings.") ➔P.446
Immediately after borderless printing, the trailing edge margin is soiled during regular printing
Immediately after borderless printing, the trailing edge margin is soiled during regular printing
Cause Corrective Action
Depending on your printing environment, after
borderless printing in which the leading and trail-
ing edge of the roll is cut automatically, any ink
adhering to the cutter unit may rub off on the next
printed document.
Follow these steps to change the Between Pages setting of Drying Time to a
value between about 30 seconds and 3 minutes before trying borderless print-
ing again.
1.
On the Main sheet of the printer driver, click Advanced Settings by Media
Type.
2.
Select an ink drying time in the list for the Between Pages setting of Drying
Time.
Printed colors are inaccurate
Printed colors are inaccurate
Cause Corrective Action
Color adjustment has not been activated in the
Advanced Settings of the printer driver.
In the Advanced Settings of the printer driver, access Color Settings in Color
Mode to adjust colors.
(See "Main Sheet (Windows).") ➔P.147
(See "Main Pane (Mac OS).") ➔P.253
Colors have not been adjusted on the computer or
monitor.
Refer to the computer and monitor documentation to adjust the colors.
Adjust the settings of the color management software, referring to the software
documentation as needed.
The Printhead nozzles are clogged. Print a test pattern to check the nozzles and see if they are clogged.
(See "Checking for Nozzle Clogging.") ➔P.545
In the Windows printer driver, Application Color
Matching Priority is not selected.
Click Special Settings on the Layout sheet of the printer driver and select Ap-
plication Color Matching Priority in the dialog box.
(See "Layout Sheet (Windows).") ➔P.160
Color may change slightly even on the same mod-
el of printer if you use a different version of the
firmware or printer driver, or when you print under
different settings or in a different printing environ-
ment.
Follow these steps to prepare the printing environment.
1.
Use the same version of firmware or printer driver.
(See "Updating the Firmware.") ➔P.577
2.
Specify the same value for all settings items.
Banding in different colors occurs
Banding in different colors occurs
Cause Corrective Action
The paper feed amount is out of
adjustment.
Adjust the feed amount.
(See "Adjusting the Feed Amount.") ➔P.526
Printing does not proceed smooth-
ly because print jobs are interrup-
ted during transmission.
Exit other applications and cancel other print jobs.
In the Control Panel menu, Adj.
Priority is set to Print Length.
Setting Adj. Priority to Print Quality in the Control Panel menu and adjusting the feed amount
may improve results.
(See "Adjusting the Feed Amount.") ➔P.526
The Printhead is out of alignment. Adjust the Printhead alignment.
(See "Automatic Adjustment to Straighten Lines and Colors.") ➔P.520
The Printhead nozzles are clog-
ged.
Print a test pattern to check the nozzles and see if they are clogged.
(See "Checking for Nozzle Clogging.") ➔P.545
To check for nozzles after printing, set Frequency in Nozzle Check in the Control Panel menu
to a setting other than Off.
Furthermore, to have a warning displayed depending on the result of the nozzle check, set
Warning in Nozzle Check in the Control Panel menu to On.
Note that when Warning is set to On, printing may stop depending on the content of the warn-
ing.
Immediately after borderless printing, the trailing edge margin is soiled during regular printing
iPF8400SE
User's Guide
Troubleshooting Problems with the printing quality
594


