


edge switch 2/16 service manual 3–27
Repair Information
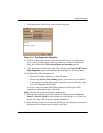
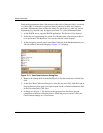
7. At the Diagnostics Test list box, select Internal Loopback.
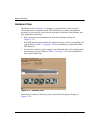
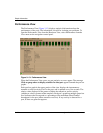
Figure 3–14: Port Diagnostics Dialog Box
8. Click Next. Beaconing initiates for the port selected for test. At the Hardware
View, a yellow triangle appears at the top of the port. At the Port Diagnostics
dialog box, the message Verify selected ports are beaconing appears.
9. Verify beaconing is enabled, then click Next. The message Press START Test to
begin diagnostics appears, and the Next button changes to a Start Test button.
10. Click Start Test. The test begins and:
— The Start Test button changes to a Stop Test button
—The message Port xx: Test running appears, where xx is the port number.
— A red progress bar (indicating percent completion) travels from left to right
across the Completion Status field.
As a port is tested, the amber LED flashes (beacons) and the green LED
extinguishes (indicating the port is blocked).
NOTE: Click Stop Test at any time to abort the loopback test.
11. When the test completes, test results appear (for each port tested) as Port xx:
Passed! or Port xx: Failed! in the message area of the dialog box. If a port fails
the test, the amber LED for the port remains illuminated.
12. When finished, click Cancel to close the Port Diagnostics dialog box and return to
the Hardware View. Beaconing is disabled for the port.