


edge switch 2/16 service manual 4–5
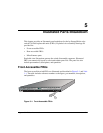
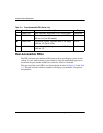
FRU Removal and Replacement
2. Turn off the power switch on the power supply.
3. Disconnect the AC power cord from the power supply.
4. Rotate the power lockout lever to the right to expose the black plastic latch lever.
5. Pull the latch lever down to the horizontal position.
The power supply will disengage and back out about 1/4 inch when the lever is
horizontal.
6. Use the latch lever to pull the power supply out of the chassis. Support the power
supply as it exits the chassis.
WARNING: To prevent electric shock, do not reach into nonvisible areas of a
switch while the switch is connected to primary facility power.
Replacement
To replace a power supply:
1. Remove the replacement power supply from its shipping container.
2. Inspect the rear of the power supply for bent or broken connector pins. If any pins
are damaged, obtain a new power supply.
3. Ensure that the power switch on the power supply is turned off, the power lockout
lever is rotated to the right, covering the AC connector, and the black plastic latch
lever is completely down in the horizontal position.
4. Insert the power supply into the chassis until it stops.
5. Raise the black plastic latch lever to the vertical position.
The power supply cams into its seated position in the chassis.
6. Rotate the power lockout lever to the left to cover the plastic lever and expose the
AC connector.
7. Verifying that the power switch is off, connect the AC power cord to the power
supply and to a facility power source.
8. Turn on the power switch.