


9-20 Applications
Applications
Book Copy (continued)
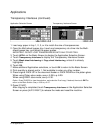
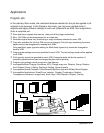
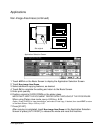
1 Load 8.5"x11" sheets in a tray or in the Multi-sheet bypass tray.
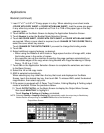
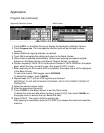
2 Touch APPLI. on the Basic Screen to display the Application Selection Screen.
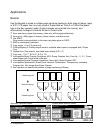
3 Touch Book Copy to enter the Book Copy Screen. AUTO layout and Non-image area
erase will be automatically selected. (Available to be released.)
4 Touch Full scan, Front cover + Full scan, or Front/Back cover + Full scan, as required.
Touch REVERSE THE SIDE OF OPEN PAGE to change the binding mode according to
the original.
Option: Touch Booklet on the Book Copy Screen to use this function.
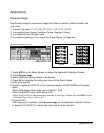
5 Touch OK to return to the Application Selection Screen.
6 Make additional application selections, or touch OK to return to the Basic Screen. The
Store mode is automatically selected.
7 Select the copy mode (1-1 or 1-2).
8 Enter the desired print quantity.
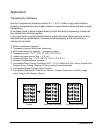
9 Position the open book or sheet on the platen glass in the right rear corner, aligning
the edge with the right measuring guide.
If Full scan is selected and the originals can be loaded in the document feeder, RADF
store mode is also available. If desired, position originals into the document feeder.
Option: Press [CHECK] to view the selection and make a Proof copy; then touch EXIT to return to the
Basic Screen. See p. 6-35 to p. 6-37.
10
Press [START] to start scanning.
11
Remove the first original(s). Repeat the procedure for subsequent originals, pressing
[START] for each original.
When Front cover + Full scan or Front/Back cover + Full scan is selected, only the front
and back covers are required to be scanned from the platen glass. If you want to use
RADF store mode for scanning the rest of the originals, close the document feeder
and position originals, then press [START].
12
Touch STORE to deselect the store mode, then press [START] to print.
After copying is completed, touch Book copy on the Application Selection Screen or
press [AUTO RESET] to release the mode and reset the machine.