


12-6 Shortcuts
Shortcuts
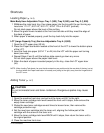
Book Copy (p. 9-19)
1 First, load letter sheets in a regular tray or in the Multi-sheet bypass tray.
2 Touch APPLI. to display the Application selection screen.
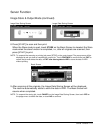
3 Touch Book Copy to display the Book copy screen with AUTO layout and Non-image
area erase selected.
4 Touch Full scan, Front cover + Full scan, or Front/Back cover + Full scan, as required.
To change the binding mode, touch REVERSE THE SIDE OF OPEN PAGE.
5 Touch OK to return to the Application selection screen.
6 Make additional copying selections.
7 Touch OK to return to the Basic screen with the Store mode automatically selected.
8 Select 1-1 or 1-2 copy mode and enter the print quantity amount.
9 Position the open book in the right rear corner on the platen glass.
10 Align the edges of the book with the right measuring guide plate, then press [START]
to begin scanning.
11 Repeat Steps 9 to 10 to copy subsequent pages from the book, pressing [START] to
scan each page.
12 Touch STORE to remove its highlight and thus turn off the Store mode.
13 Press [START]. When copying is completed, press [AUTO RESET] to reset the machine.
Program Job (p. 9-21)
1 Touch APPLI. to display the Application selection screen.
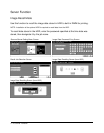
2 Touch Program Job to scan multiple sets of originals in different settings (called
JOBs) and then to output them all as a complete set.
3 Make additional copying selections for the first JOB.
4 Touch OK to return to the Basic screen. Store mode is automatically selected.
5 Position original(s) face up in the document feeder or face down on the platen glass,
select the tray you want to use, then press [START] to scan.
6 When scanning for the current JOB is completed, the popup menu will be displayed.
To store the current JOB images, touch DECISION.
To delete the images, touch CANCEL.
7 Repeat steps 3 to 6 until all JOB originals are scanned.
8 Select the desired output mode and enter the print quantity amount.
9 Touch STORE to remove its highlight and thus turn off the Store mode.
10 Press [START]. When copying is completed, press [AUTO RESET] to reset the machine.
Non-Image Area Erase (p. 9-23)
1 Touch APPLI. to display the Application selection screen.
2 Touch Non-Image Area Erase.
3 Make additional copying selections.
4 Touch OK to return to the Basic screen.
5 Enter the print quantity amount.
6 Position original face down on the platen glass, keeping the document cover open.
7 Press [START]. When copying is completed, press [AUTO RESET] to reset the machine.