


26 PresentationPRO-II • User’s Guide
3. Hardware Installation
Installation
4. If you are rack mounting the PresentationPRO-II chassis, follow the rack mount
procedures as outlined in the “
Rack-Mount Installation” section on page 22.
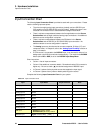
5. Ethernet Connections (optional, for use with an external controller) — a
completely “local” network connection is recommended, without IP connections to
the outside world.
a. Using an Ethernet cable, connect the PresentationPRO-II’s Ethernet port
to a Hub or Switch.
b. Connect the Ethernet Hub or Switch to the external controller’s Ethernet
port.
6. Source Connections
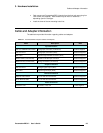
a.
As an important prerequisite, complete the “Input Connection Chart” on
page 24 to streamline your source installation procedure.
b. Using the information from the chart, connect the desired sources to the
analog and digital input connectors as required.
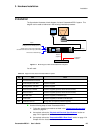
7. Output Connections
a. One Analog Program Output is provided. Connect this output to the
input of your analog projector, or analog Program monitor.
b. One Digital Program Output is provided: Connect this output to the
input of your digital projector, or digital Program monitor.
8. Power Connection — connect an AC power cord to the AC Power Connector
on the rear of the PresentationPRO-II chassis, and then to AC outlets. Connect
AC Power cords (or AC adapters) to all peripheral equipment such as your
monitor, projector and source devices. Please note:
~ Connect each unit only to a properly rated supply circuit.
~ Reliable grounding (earthing) of rack-mounted equipment should be
maintained.
9. Power On — turn on power to all units.
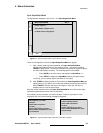
10. Display Calibration — calibrate the Touch Screen display using the Display
Settings Menu
. From the Home Menu, press {DISPLAY} > {LCD CAL}, and
following the prompts to calibrate the display.
This completes the hardware installation procedure. Please continue with Chapter 4,
“
Menu Orientation.”