


2 - 9
• or by connecting the car power adapter (CLA) to the I/O connector at the base of the MX9.
Note: An uninterrupted external power source (wall AC adapters) transfers power to the computer’s internal charging circuitry
which, in turn, recharges the main battery and internal battery. Frequent connection to an external power source, if
feasible, is recommended to maintain internal battery charge status as the internal battery cannot be recharged by a dead
or missing main battery.
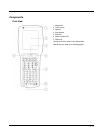
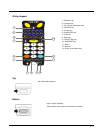
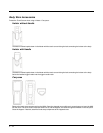
LEDs, Backlights and Indicators
Status LEDs
Several LEDs are located on the front of the MX9 above the speaker. They are:
• System Status (SYS) LED indicates power management status (far left LED).
• Battery Charging Status (BATT) LED indicates main battery charging status (far right LED).
• Alpha Mode Status LED applies to the 38-key keypad only (LED is next to SYS LED).
• Bluetooth Status LED applies to Bluetooth client functions (LED is next to BATT LED).
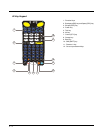
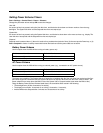
System Status LED
Battery Charging Status LED
Alpha mode Status LED
• Green when in alpha mode, 38-key keypad only.
Bluetooth Status LED
• Blue when Bluetooth activated
• Off when Bluetooth not activated.
Keypad Backlight Setting
The keypad backlight is white and can be set to be on or off. The default value is on.
When set to off, the keypad backlight does not turn on during Suspend/Restart or reboots.
When set to on, the keypad backlight follows the display backlight settings. The keypad backlight turns off when the display
backlight dims.
Toggle Vibrate Indicator
The MX9 vibration motor is activated when a scan is completed successfully (good scan vibration) or with a failure (scan
key released before good scan, timeout, or rejected because of Data Options configuration).
The vibrations can be detected under the hand strap or through the trigger handle.
Toggle the vibrate indicator on or off by tapping the desired radio button for Good Scan Vibration and Bad Scan Vibration.
Options are: Off, Short, Medium or Long.
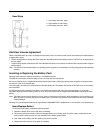
Tapping the Touch Screen with a Stylus
Note: Always use the point of the stylus for tapping or making strokes on the touch screen.
Blinking Red Battery power fail; critical suspend
Solid Red Main battery low
Yellow / Amber Initial few seconds when Power key is pressed
Off No battery, no AC power, battery pack not plugged in or no AC power applied
Flashing Red Fault, battery pack fault or failure
Yellow / Amber Standby, battery pack temperature out of range
Red Charging, battery pack charging (icon on touch screen)
Green Charged, battery pack fully charged. Connected to external power.