


Repair Information 4-19
5016-001
Electronics Removals
CAUTION: When working on the printer, always unplug the printer
from the electrical outlet. Line voltage is present in the printer as
long as it is plugged into the electrical outlet.
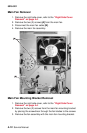
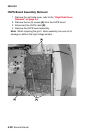
Controller Board Assembly Removal
1. Remove the rear cover, refer to the “Rear Cover Removal” on
page 4-3.
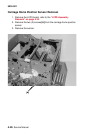
2. Loosen the six (6) screws of the controller board shield
assembly.
3. Remove the two (2) screws from the outside left of the controller
board assembly.
4. Remove the four (4) screws from the controller board.
5. Remove the board by pulling upwards and out of the printer.
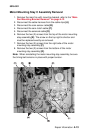
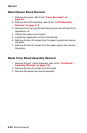
Engine Board Assembly Removal
1. Remove the top cover, refer to the “Top Cover Removal” on
page 4-4.
2. Remove the print cartridges.
3. Remove the controller board assembly, refer to the “Controller
Board Assembly Removal” on page 4-19.
4. Remove the five (5) screws from the engine board PCB shield
and remove the shield.
5. Disconnect the toner detection sensor cable.
6. Disconnect the twelve (12) cables from the engine board.
7. Remove the three (3) remaining screws from the engine board.
8. Remove the engine board assembly.