


4-24 Service Manual
5016-001
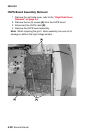
Main Body
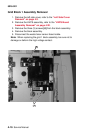
Paper Feed Block Assembly Removal
Note: The paper pick mechanism is a part of the paper feed block
assembly.
1. Remove the front cover, refer to the “Front Cover Removal”
on page 4-3.
2. Remove the screw (1) from the left side of the paper feed block.
3. Remove the screw (1) from the right side of the paper feed
block.
4. Pull the paper feed block forward enough to remove the paper
drive mechanism cable from the cable clips.
5. Remove the paper feed block assembly.
Paper Sensor Board Removal
Refer to the “Paper Sensor Board” on page 4-21.
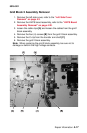
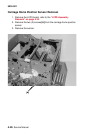
Printhead Removal
1. Remove the top cover, refer to the “Top Cover Removal” on
page 4-4.
2. Remove the front cover assembly, refer to the “Front Cover
Removal” on page 4-3.
3. Remove the print cartridges.
4. Remove the three (3) perimeter screws in the printhead
assembly.
5. Remove the two (2) screws in the blind plate and remove the
blind plate from the engine board PCB shield plate.
6. Remove the screw (1) in the cable harness cover.
7. Disconnect the printhead cable on the engine board from CN14.
8. Disconnect the four (4) remaining printhead cables.
9. Remove the printhead assembly carefully, though the front of
the printer.
10. Remove the discharge PCP LED from the top of the printhead
housing and install it on the new printhead assembly.