


Repair Information 4-25
5016-001
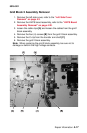
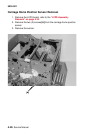
Print Cartridge Carousel Removal
1. Remove all covers, refer to “Cover Removals” on page 4-2.
2. Remove the motor mounting stay assembly, refer to the “Motor
Mounting Stay C Assembly Removal” on page 4-13.
3. Remove the OPC coupling drive block assembly, refer to the
“OPC Coupling Drive Block Assembly Removal” on
page 4-14.
4. Remove the C-clip and two (2) washers from the right side of
the coupling transmission shaft.
5. Remove the inner C-clip from the left side of the coupling
transmission shaft.
6. Remove the coupling transmission shaft by pulling it out of the
printer from the left side.
Note: When reinstalling the coupling transmission shaft, be sure the
C-clip and washers are in the following order:
• Left side: C-clip, washer spring, washer, white transfer
bracket, washer, C-clip.
• Right side: C-clip, washer, white transfer bracket, washer,
C-clip.
7. Remove the coupling transmission bushing from the right and
left side of the coupling transmission shaft.
8. Remove the two (2) screws from the carriage center block from
the left and right side of the printer.
9. Remove the center screw from the carriage center block on the
left and right side and remove the carriage center block from
both sides.
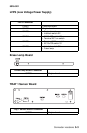
10. Remove the toner cartridge cover bracket clutch by removing
the screw (1) on the left and the two (2) screws on the right.
11. Remove the two (2) screws from the top of the cable cover 4.
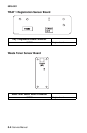
12. Remove the screw (1) and unsnap the latch from the black
plastic cable shield and remove the shield.
13. Remove the print cartridge carousel by rotating it out of the
printer. Be careful of the HVPS contacts on the left side of the
printer.
14. When replacing the print cartridge carousel, be sure the left side
of the carousel remains flat against the left side of the printer
while rotating it back into place.