


40
PhaserShare Networking Manual
4
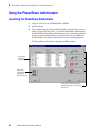
Novell NetWare Configuration
Setting IPX frame types from the front panel
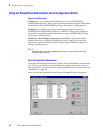
Setting IPX frame types: Phaser 840
1.
When the front panel displays READY TO PRINT, press the down-arrow
button until Menu is highlighted. Press Select.
2.
Press the down-arrow button until Printer Configuration is
highlighted. Press Select.
3.
Press the down-arrow button until Network Settings is highlighted.
Press Select.
4.
Press the down-arrow button until NetWare is highlighted. Press Select.
5.
Press the down-arrow button until IPX Frame Type is highlighted. Press
Select.
6.
Press the down-arrow button until the desired frame type is highlighted.
Press Select until On is displayed. If desired, you can set more than one
frame type.
7.
To return the printer to normal operation, press the down-arrow button
until Exit is highlighted. Press Select.
Setting IPX frame types: Phaser 740 and Phaser 360 printer
N
O
T
E
If you are attempting to perform any front panel procedure and you don’t see the
expected menu choices, the front panel may be locked. For information on how to
unlock it, see “If the front panel is locked” on page 165.
1.
Enter the Network Settings menu:
a.
Press Menu; the front panel displays Help Pages.
b.
Press ----> or <---- until the front panel displays Network
Settings.
c.
Press Menu; the front panel displays TCP/IP.
2.
Access the menu of frame types:
a.
Press ----> until the front panel displays NetWare.
b.
Press Menu; the front panel displays Enable Interface.
c.
Press ---->; the front panel displays IPX Frame Type.
d.
Press Menu; the front panel displays the first in a menu of frame types.