


ADCP-61-471 • Issue 4 • June 2000 • Section 2: Operation and Maintenance
2-196
© 2000, ADC Telecommunications, Inc.
DLP-562
Page 1 of 3
HLX ALARM LEVEL SETTING
Summary:
This procedure provides instructions for setting HLX Alarm Levels.
Note:
A “toggle” field type means the user can press the space bar to view and select the
next option that is described; or the user can press the “R” key to view and select the
previous option. An “input” field type means the user must type an entry in the field
according to the parameters described. A “fixed” field is locked, and cannot be changed by
the user.
Note:
Edits can be
made
in the configuration database in one of two ways: 1) If the
complete field is highlighted, use the space bar to toggle forward or the “R” key to
reverse toggle through the options for that field. 2) If only the first space or the field is
highlighted, type in the data that applies to that field.
Note:
Edits to the configuration database can be
saved
after each change in one of two
ways: 1) Press an arrow key and then Enter or Return
once
; or 2) Press Enter or Return
twice
after all selections and entries are made in the screen but before leaving the screen.
If the entries have been accepted, a message “Configuration Successful…
Press Any Key To Continue” appears on the screen.
Note:
Press CONTROL-A for help information on moving around and editing fields.
1. Use the arrow keys to select Alarms from the Main Menu. Press Enter or Return.
2. Use the arrow keys to select Set Alarm Levels from the Alarms menu. Press Enter or
Return.
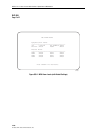
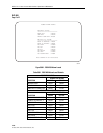
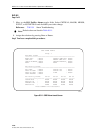
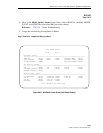
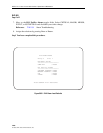
3. Select Set HLX Alarm Levels from the Set Alarm Levels Menu. Press Enter or Return. An
HLX Alarm Levels screen is shown in Figure 562-1.
4. Move to the
Group
toggle field. Select group number 1, 2, 3, 4, 5, 6, or 7.
5. Move to the
Slot
toggle field. Select slot number 1, 2, 3, or 4.
Reference:
TAD-106 Access Identifier
6. Move to the
Equipment Alarms
toggle fields. Select CRITICAL (CR), MAJOR (MJ),
MINOR (MN), EVENT (EV) or NOT RPTD (not reported) for each field that you wish to
change.
Note:
Abbreviations of the alarm field options (except NOT RPTD) will appear in the
Active Alarms and Alarm History screens. In addition, what options you select at any
alarm level setting screen will determine whether you will be notified of the alarm.
Reference: DLP-552 Alarm/Event Notification Level Setting
7. Move to the
DS1 Facility Alarms
toggle fields. Select
CRITICAL, MAJOR, MINOR,
EVENT, or NOT RPTD for each field that you wish to change.