ADCP-61-471 • Issue 4 • June 2000 • Section 2: Operation and Maintenance
2-38
© 2000, ADC Telecommunications, Inc.
DLP-506
Page 2 of 5
1. The fibers should have been placed in the rack when the chassis was installed. Route the
fibers through the fiber management baffle into the top of the chassis to the ODS2 module
locations. Protective covers must be in place on the fiber connectors to prevent dust and
damage to the connections. The fibers should be tagged to identify the circuit and the
transmission direction.
2. Select the ODS2 module. If the module is not already installed, remove the module from
the protective ESD packaging. If ODS2 module is installed, remove it and inspect for
physical damage.
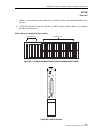
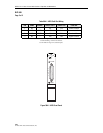
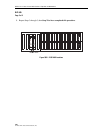
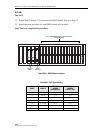
3. Refer to Figure 506-1 for ODS2 module locations. Then refer to Table 506-1 and your work
order for slots to be used. Working ODS2 modules are always installed in the top odd slots
(1-1, 2-1, 3-1, 4-1, 5-1, 6-1, and 7-1). Protection ODS2 modules are installed in the
adjoining odd numbered slots (1-3, 2-3, 3-3, 4-3, 5-3, 6-3, and 7-3).
Reference:
TAD-106 Access Identifier
4. Insert the working ODS2 module first. Align the module with the slots and slide module
into the chassis until the two fiber connectors protrude about three inches out from the front
of the chassis. Do not seat module in connector at this time.
5. Remove the protective dust caps from the transmit and receive connectors on the ODS2
module.
6. Remove the protective covers from the fibers.
7. Clean fiber optic connectors and adapters.
Reference:
DLP-507 Fiber Optic Connector and Adapter Cleaning and Mating
Instructions
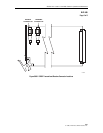
8. Connect a fiber optic patch cord between the transmit and receive connector on the ODS2
module. See Figure 506-2. This sets the configuration of the module in optical loopback.
9. Using the ODS2 module ejector, press the module into the chassis until it is properly seated.
10. On the APU, press LMPTST/APS switch. Did all ODS2 indicators light?
• If
Yes
, continue to Step 11.
• If
No
, replace ODS2 module and go to Step 4.
11. Is the STATUS indicator on the ODS2 module lighted green?
• If
Yes
, continue to Step 12.
• If
No
, replace ODS2 module and go to Step 4.


