


134
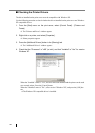
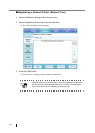
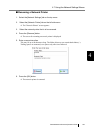
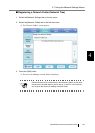
6. Enter a "Network Path".
"Network Path" may be up to 255 characters long.
Set the network path in the following format:
\\Domain_name\Computer_name\Printer_alias
For the "Domain_name", specify the NetBIOS domain name or the workgroup name that
the network printer belongs to.
For the "Computer_name", specify the IP address, host name, or FQDN.
When specifying the IP address or FQDN for "Computer_name", a primary DNS suffix
setting for the print server is required.
When a primary DNS suffix for the print server is already set, the following settings are not
required.
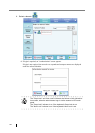
The procedure for setting a primary DNS suffix is as follows.
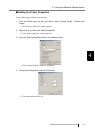
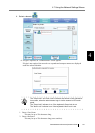
1. From the [Start] menu on the print server, select [Control Panel]-[System].
For Windows Server 2008 or Windows Server 2012, from the [Start] menu, select
[Control Panel]-[System], and then select [Advanced system settings] on the [System]
window.
The "System Properties" window appears.
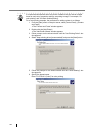
2. Select the [Change] button in the [Computer Name] tab.
For Windows 2000 Server, select the [Properties] button in the [Network Identifica-
tion] tab.
The "Computer Name Changes" window appears.
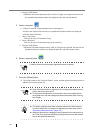
3. Select the [More] button.
The "DNS Suffix and NetBIOS Computer Name" window appears.
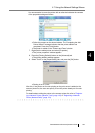
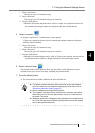
4. For "Primary DNS suffix of this computer", specify the DNS suffix to be appended to the
name of this computer when completing its FQDN.
Example: example.com
5. After these changes are applied, restart the computer.
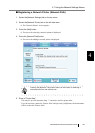
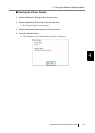
7. Press the [Add] button.
The screen returns to the "Network Printers" screen, and the registered network printer is
added to the network printer list.
ATTENTION
z The already registered network printer cannot be added.
z Once the network printer is registered, do not change the shared name or
printer alias on the print server.
z To change the shared name or printer alias, remove the registered net-
work printer first, and then change the share name/printer alias, and reg-
ister it again.
HINT
z The default network printer alias will be the same as the alias selected
from the network tree. For details on changing the printer alias, refer to
"Renaming a Network Printer" (page 135).
z The authentication screen may appear.