


104 Chapter 14 Configuring Hunt Groups
N0060600N0060600
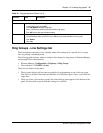
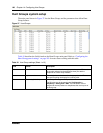
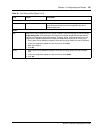
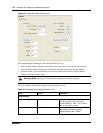
Figure 38 Hunt Group Members and Line Assignment tables
Table 35 describes the fields found on the Details for Hunt Groups tables.
Table 35 Hunt Group tables (Sheet 1 of 2)
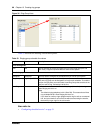
Field Values Description
Hunt Group Members subpanel
Seq. No. <read-only> This is the position of the telephone on the list. This is particularly
important for linear calls, which start at the top of the list, and
move sequentially through the list.
DN <DN> This is the DN of the telephone assigned to this hunt group.
Appearance Type Ring only
Appr&Ring
Appr only
Select the setting that suits the telephone and the environment.
Ring only: Telephone rings when a call comes in. (7000 and
7100 digital phones and telephones that have no available
programmable memory buttons with indicators)
(model 7000 phones are supported in Europe only.)
Appr&Ring: Appears on a button with indicator, which flashes
when a call comes in, and it also rings.
Appr only: Appears on a button with indicator, which flashes
when a call comes in.
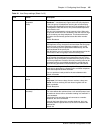
Action
Add 1. On the Hunt Groups panel, select the group where you want to add members.
2. In the Members subpanel in the lower frame, click Add.
3. Enter the DN for the telephone you want to add as a member.
4. Select an Appearance Type from the drop-down list.
Delete 1. On the Hunt Groups panel, select the hunt group where you want to delete members.
2. In the Members subpanel in the lower frame, click the DN row to be removed.
3. Click Delete located under the Hunt Group Members subpanel.
4. Click Yes.
Up Member order within a Hunt group is important. The member order determines how a call routes
through a Hunt group when the group is set to either linear or rotary mode.
1. Click a member from the member list.
2. Click either the Up or the Down button. The system automatically reorders the list.
Down