


6. Appendix
Printing Guide — Managing Fonts with Font Manager 361
Installing Fonts in Windows
After searching the fonts, you can install them in Windows. Once the fonts are installed
in Windows, the fonts can be displayed on the dialog box in applications and printed by
the machine.
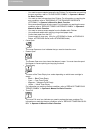
Installing the TrueType fonts
1. Highlight the fonts you want to install in Windows from the
“Available Font List”.
2. Click the [Fonts] menu and select [Install].
3. The fonts are installed in Windows and added to the installed
fonts list.
Uninstalling Fonts in Windows
You can uninstall the fonts in Windows. However, even if you uninstall the fonts from
Windows, the source files of the uninstalled fonts are not deleted from the drive.
Uninstalling the TrueType fonts
1. Highlight the fonts you want to uninstall from Windows from
the installed fonts list.
2. Click the [Fonts] menu and select [Un-install].
3. The fonts are uninstalled from Windows. The uninstalled
fonts are added to the “Available Fonts List”.
Removing Fonts from the Computer
You can remove from your computer the fonts that no longer be required. Even if you
uninstall the fonts from Windows, the source files of the uninstalled fonts are not deleted
from the hard drive. You can remove the sources of the uninstalled fonts from your com-
puter by this function.
Before removing the fonts, the fonts must be uninstalled from Windows first.
Removing the TrueType font files from your computer
1. Highlight the fonts you want to remove from your computer
in the installed fonts list.
2. Click the [Fonts] menu and select [Remove Font].
3. The Remove Fonts dialog box appears.