


2. Installing Client Software
92 Printing Guide — Installing Client Software for Windows
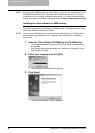
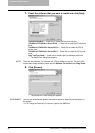
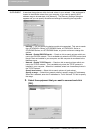
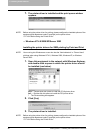
SUPPLEMENT: It searches the equipment within the local subnet in your network. If the equipment is
located in the different subnet from your computer, or you want to specify the IP
address range to be searched, click [Advance]. The Discovery Settings dialog box
appears and you can specify the advanced settings for searching the equipment.
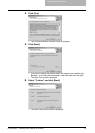
- Devices — You can specify the device models to be searched. This sets to search
the e-STUDIO451c Series, e-STUDIO850 Series, e-STUDIO4511 Series, e-
STUDIO450 Series, or e-STUDIO280 Series, so you do not have to change this
options.
- Network - Enable IPX/SPX Search — Check on this to search printers which con-
nect to the IPX/SPX network. This is available only when the IPX/SPX protocol and
Novell Client are installed in your computer, and the computer is connected to the
NetWare server.
- Network - Enable TCP/IP Search — Check on this to search printers which con-
nect to the TCP/IP network. This is available only when the TCP/IP protocol is
installed in your computer. When this is enabled, select how it searches printers in
the TCP/IP network.
Search local subnet — Select this to search printers in local subnet.
Specify a range — Select this to search printers in specific range of IP addresses.
When this is selected, enter the IP addresses in “From” field and “To” field to specify
the range.
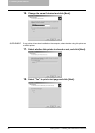
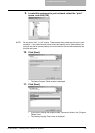
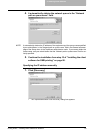
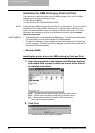
3. Select the equipment that you want to connect and click
[OK].