


ColorQube™ 9201/9202/9203 Device Connection
System Administrator Guide 2-3
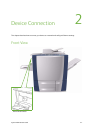
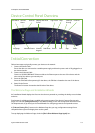
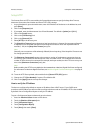
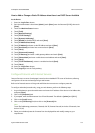
Device Control Panel Overview
Initial Connection
Follow these steps to physically connect your device to the network.
1. Connect the Power Cable
Ensure the device is connected to a suitable power supply and that the power cord is fully plugged in to
the electrical outlet.
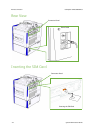
2. Connect the Ethernet Cable
Connect a 10/100/1000 BaseT Ethernet cable to the Ethernet port at the rear of the device and the
other end of the cable to your network port.
3. Insert the SIM Card
Insert the SIM Card before powering On the device, the SIM slot is located at the rear of the device.
4. Power On the Device
The Power On button is located at the left-side of the device.
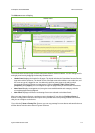
The Welcome Page and Installation Wizards
An Installation Wizard displays the first time the device is powered on, providing the ability to set the date
and time.
Simultaneously, a Welcome Page is enabled as the opening page of the device's Internet Services web
pages. You can click [Configure Device] on this Welcome Page, or click the Configuration Overview link on
the Properties tab, to go directly to the Install Wizards for configuring protocols and optional services.
A [I Have a Cloning File...] button on the Welcome Page lets you copy configuration settings from a
compatible Xerox system and apply them to this system.
To stop displaying the Welcome Page, check the [Don’t Show Welcome Page Again] box.
Services
Home
Job Status
Machine Status
Display and Touch
Screen
Log In/Out Help
CancelNumeric
Keypad
StopStart Power
Clear AllInterrupt
Printing
Language
Services
Dial Pause