


ColorQube™ 9201/9202/9203 General Setup
System Administrator Guide 3-3
4. Touch [Device Settings].
5. Touch [Configuration/Information Pages].
6. Touch the [No] button under Print Configuration at Power On.
7. Touch [Save].
8. Press the <Log In/Out> button, then touch [Logout] to exit the Tools pathway.
Configure Print Protocols
1. At your Workstation, open the web browser and enter the IP address of the device in the Address bar,
and press [Enter].
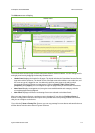
2. At the welcome page, click on the [Configure Device] button.
3. If prompted, enter the Administrator User ID and Password. The default is [admin] and [1111].
4. Click on the [Login] button.
5. If you want to use the checklist, click on the [View Checklist] button and click on the [Print] button.
Scroll to the bottom of the screen and click on the [Close] button.
6. Click on the [Settings] button next to Print Protocols.
7. Click on the [Configure] button next to General Settings to configure general print settings.
8. Click on the [Save] button when you have finished configuring general settings.
9. Click on the [Configure] button next to the IP (Internet Protocol), to enable on the device to support
your network environment.
10. Enter the information for your chosen protocol. If you need more information on how to configure
protocol information refer to Network Installation on page 5-1.
11. Click on the [Save] button. You have finished configuring the protocol information, click on the [Close]
button.
12. To print to the device, install the printer drivers on your workstation. If you need more information refer
to Print Drivers on page 6-1.
Configure Services
If you have installed one or more optional service on your device you can configure the service from Internet
Services.
If you need more specific information about services and how to configure them, refer to the following
chapters for each service:
• Workflow Scanning on page 10-1
• E-mail on page 13-1
• Internet Fax on page 14-1
• Server Fax on page 23-1
• Embedded Fax on page 15-1
• LAN Fax on page 16-1
• Network Accounting on page 20-1
1. At your Workstation, open the web browser and enter the IP address of the device in the Address bar,
and press [Enter].
2. Click on the [Properties] tab.
3. If prompted, enter the Administrator User ID and Password. The default is [admin] and [1111].
4. Click on the [Login] button.