


ColorQube™ 9201/9202/9203 General Setup
System Administrator Guide 3-5
4. Click on the [Login] button.
5. Click on the [General Setup] link.
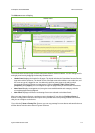
6. Select [Cloning] in the directory tree.
7. From the Create Clone File area, check to boxes next to the feature to select the settings that you wish
to clone. To clone all features, click on the [Select All] button, or to customize the configuration file
disable any of the features by clicking the checkboxes next to the feature(s) and then click on the
[Clone] button.
8. In the Cloning Instructions area, right-click on the [“Cloning.dlm”] link that appears and select [Save
Target As].
9. A dialog box will prompt you to specify a name and location for the cloned file. Ensure the extension
reads ‘.dlm’.
10. Click [Save]. The ‘.dlm’ file can now be used to clone other devices.
To Install the Clone File on Another Device
Note
This procedure will cause the device to reboot and will be unavailable over the network for several
minutes.
1. Click on the [Status] tab.
2. Select [Welcome] in the directory tree.
3. Click on the [I Have A Cloning File] button.
4. If prompted, enter the Administrator User ID and Password. The default is [admin] and [1111].
5. Click on the [Login] button.
6. Scroll down to the Install Clone File area, click on the [Browse] button to locate your file.
7. Click on the [Open] button, then click on the [Install] button.
The device will be unavailable over the network for several minutes. Once rebooted a Configuration Report
will print, if enabled.
Image Settings
The Image Settings screen allows you to set preferences for the various file formats that the device is
capable of creating when features such as E-mail and Internet Fax are used at the device.
Accessing Image Settings (including Linearized PDF) and XPS
1. At your Workstation, open the web browser and enter the IP address of the device in the Address bar,
and press [Enter].
2. Click on the [Properties] tab.
3. If prompted, enter the Administrator User ID and Password. The default is [admin] and [1111].
4. Click on the [Login] button.
5. Click on the [General Setup] link.
6. Select [Image Settings] in the directory tree.
7. Select and configure the Image Settings for the various file formats as desired.
8. When done, click on the [Apply] button.