


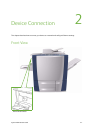
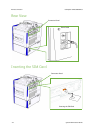


Device Connection ColorQube™ 9201/9202/9203
2-6 System Administrator Guide
3. Press the <Machine Status> button, and then the [Tools] tab.
4. Wait for the screen to refresh, touch [Network Settings], touch [Advanced], if a warning message
appears, touch [Continue].
5. Touch the [HTTP Settings] button, touch [Enable], touch [Save], then touch [Close] to return to the
Network Setting screen.
6. Touch [TCP/IP Settings].
7. Configure TCP/IP settings, including DHCP (Dynamic Addressing) and DNS, touch [Save], touch the
[Close] button to return to the Network Setting screen.
Note
This device supports IPv6 addressing, with an automatically-built Link Local Address for broadcasting to
routers that can supply the network-layer configuration parameters. See Configure Protocols with
Internet Services on page 2-9.
Quick Setup
When your device is configured with an IP address and HTTP is enabled, you can configure network
information from your web browser via Internet Services. Enter the IP address of the device in your web
browser to access Internet Services.
CentreWare Internet Services
CentreWare Internet Services is the embedded HTTP server application that resides in the device. Internet
Services allows Administrators to change network and system settings on the device from the convenience of
their desktops.
Many of the features available within Internet Services will require an Administrator User Name and
Password. The default User Name is admin and the default Password is 1111. A user will only be prompted
for an Administrator’s User Name and Password once in a single browser session.
System Configuration
To use CentreWare Internet Services, you need to enable both TCP/IP and HTTP on the device. See How to
Add or Change a Static IP Address when there is no DHCP Server Available on page 2-9.
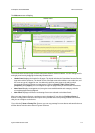
Access Internet Services
To view the [Internet Services Welcome] screen:
1. Enter the device's IP Address in the web browser.
2. Press [Enter] or click on the [Go] button. For example: