


5-4
Cisco MGX 8800/8900 Series Hardware Installation Guide
Releases 2 - 5.2, Part Number OL-4545-01, Rev. H0, May 2006
Chapter 5 Installing the Cisco MGX Switch or Gateway
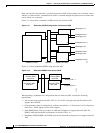
Installing the MGX 8850 (PXM1E/PXM45) Switch, MGX 8850/B or MGX 8880 Media Gateway
Note After completing these steps, proceed to the “First Time Power On Procedure for MGX Switches”
section on page 5-137 if this is a first-time installation.
Installation Procedures
Warning
The switch should not receive power while you install components.
The following sections describe how to install the MGX 8850, MGX 8850/B, and MGX 8880 systems.
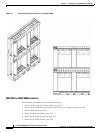
Special Installation Notes for the MGX 8880 Media Gateway
Installing the MGX 8880 gateway varies from MGX 8850 installation in the following ways:
• The MGX 8880 DC version is 14 RUs. The AC version is 17 RUs. The new low profile cooling
system makes the space savings possible. Refer to Table 3-24 and Table 3-25 when planning your
MGX 8880 space needs.
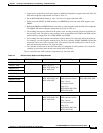
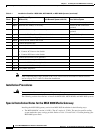
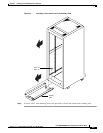
Step 10
Install the Exhaust Plenum Connect the Alarms (optional)
Step 11
Install the DC PEM(s) as necessary Connect the MP Connection
(optional)
Step 12
Install the Cable Management Assembly Connect the LAN1/2 Ports
(optional)
Step 13
Connect the Fan Tray Power Cables to the switch Verify EMI Compliance
Step 14
Connect the AC Power Supply Tray to the switch as necessary
Step 15
Connect the DC PEM to the switch
Step 16
Connect the Back Cards
Step 17
Connect the Console Port
Step 18
Connect Power to the switch
• Connect AC Power to the Switch
• Connect DC Power to the Switch
Step 19
Connect the External Clock (optional)
Step 20
Connect the Alarms (optional)
Step 21
Connect the MP Connection (optional)
Step 22
Connect the LAN1/2 Ports (optional)
Step 23
Verify EMI Compliance
Table 5-1 Installation Checklist—MGX 8850, MGX 8850/B, or MGX 8880 Systems (continued)
Check Steps
Rack-Mounted System
(Without Lift) Rack-Mounted System (with Lift) Cisco Cabinet System