


Performance Testing and Calibration
Calibration
4
4-19
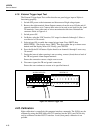
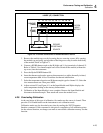
Activate calibration mode by pressing and holding the CAL Enable button (front panel)
for approximately 4 seconds. Release the button after Hydra beeps and the CAL
annunciator lights.
Note
The CAL Enable button is located on the right side of the display and is
recessed beneath a calibration seal. Press this button with a blunt-tipped
object. Avoid using a sharper-tipped object (such as a pencil). Do not press
CAL ENABLE unless you intend to calibrate the instrument. If you have
activated Calibration and wish to exit calibration immediately, press CAL
ENABLE momentarily a second time.
The instrument must be stabilized in an environment with ambient temperature of 22 to
24ºC and relative humidity of less than 70% and have been turned on for at least 1/2
hour prior to calibration.
The instrument should normally be calibrated on a regular cycle, typically every 90 days
or 1 year. The chosen calibration cycle depends on the accuracy specification you wish
to maintain. The instrument should also be calibrated if it fails the performance test or
has undergone repair.
The instrument features closed-case calibration controlled over the Computer Interface.
Using known reference sources, closed-case calibration has many advantages. There are
no parts to disassemble, no mechanical adjustments to make, and the instrument can be
calibrated by an automated instrumentation system.
Once the instrument is in calibration mode, closed-case calibration can be made for the
four calibration groups: Volts DC, Volts AC, Resistance, and Frequency. Once begun,
each group must be completed successfully for the results of the calibration to be made
permanent. It is not necessary to perform all calibration groups. Each group is
independent of the other three groups; completion of a group sets the constants for that
group.
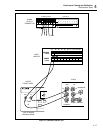
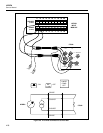
Analog inputs are made at the rear-panel Input Module, and computer interface
commands are used to control each step of the process. Either of the following two
closed-case calibration procedures can be used:
• Using Hydra Starter Calibration Software
This procedure uses software supplied with this Service Manual.Instructions for each
step are presented on the PC screen.
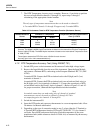
• Using a Terminal
This procedure relies on individual commands for each step. A summaryof these
commands is presented in Table 4-8.
With either closed-case procedure, an additional procedure (reference junction
calibration) may be used to calibrate the thermocouple temperature function. This
procedure requires physical access to the rear panel Input Module.
Note
The instrument returns a Device Dependent Error prompt (!>) if a
calibration step fails. Usually, this happens if the reference is not within an
anticipated range (5 to 15%, depending on the step). At this point, the
response to the CAL_STEP? command equals the raw, uncalibrated
reading taken on the reference input. Refer to Calibration Failures in
Section 5 for more information.