


Performance Testing and Calibration
Calibration
4
4-21
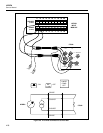
3. From the CAL directory on the PC, type CAL. Then press any key to start the
program and access the SETUP menu.
4. On Hydra, press POWER ON. After the initialization process has concluded, use the
following procedure to set up communications:
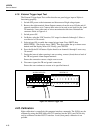
a. Press SHIFT and then LIST(COMM).
b. With ’BAUd’ displayed, use the UP or DOWN arrow key to selectthe desired
baud rate. Then press ENTER.
c. With ’PAR’ (parity) displayed, use the UP or DOWN arrow key toselect the
parity. Then press ENTER.
d. With ’CtS’ (2635A only; Clear to Send) displayed, use the UP orDOWN arrow
key to select the Clear to Send flow control ’OFF’.Then press ENTER.
e. With ’ECHO’ displayed, use the UP or DOWN arrow key to select’OFF’. Then
press ENTER. Communications setup for Hydra is nowcomplete.
5. On the PC, use the SETUP menu to match the communication parameters defined
above for Hydra.
6. On Hydra, break the calibration seal on the front panel display. Then press and hold
the CAL Enable button (approximately 4 seconds) until ’CAL’ is displayed. Press
this button with a blunt-tipped object. Avoid using a sharper-tipped object (such as a
pencil).
7. On the PC, use the right and left arrow keys to select CAL. Then press the ENTER
key. A message asking if you want to calibrate is displayed. Press Y and ENTER.
The next displayed message specifies the voltage to be applied to channel 1.
4-23. Calibration Procedure Using Starter
Use the following procedure to calibrate Hydra with the Hydra Starter Package:
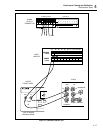
1. Connect the channel 1 test leads to the 5700A output.
2. On the 5700A, select the output voltage specified on the PC (step 7 above.)
3. On the PC, press ENTER. If the input voltage is within a predetermined acceptable
boundary, Hydra performs a calibration for this step. The program then prompts you
for the next input value.
Note
"Bad Calibration Input Value" is returned if the input is not acceptable
(the calibration step could not be executed.) Verify that the input to Hydra
channel 1 is the correct value and polarity. Also verify that the 5700A is
in OPERATE mode. If the input is correct and "Bad Calibration Input
Value" is still returned, repair of Hydra may be required.
4. Following the prompts, complete all steps for this calibration group.
5. You will then be asked if you want to perform the next calibration group. Press Y -
ENTER.
6. Following the prompts, complete all steps in the remaining calibration groups.