


Chapter 6 Managing BCM50 with SNMP 143
BCM50 Administration Guide
3 Click the SNMP Trap Destinations tab.
The SNMP Trap Destinations panel is displayed.
4 Click the Add button.
The Add Trap Destination dialog box opens.
5 Configure the Add Trap Destination attributes.
6 Click the OK button.
The new trap destination is displayed in the Trap Destinations table.
Viewing and modifying SNMP trap destinations
Once you have configured SNMP settings, you can view and administer SNMP trap destinations.
You can delete and modify SNMP trap destinations.
To modify a trap destination
1 Select Configuration>Administrator Access > SNMP > SNMP Trap Destinations or
Administration > General > SNMP Trap Destinations..
2 In the Trap Destinations table, select a trap destination.
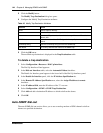
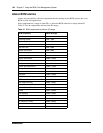
Table 44 Add Trap Destination Attributes
Attribute Action
Name Enter a name for the trap.
Host Enter the IP address of the trap destination.
Port Enter the UDP port number from which the trap will be sent. The default
value is 162.
SNMP Version Select the version of the SNMP Agent for the trap. Options are: v1/v2C,
and v3.
Community String Enter the community string to use for the SNMP trap.
User Name For v3 only, enter the user name for the SNMP trap.
Note: When the SNMP agent is restarted, the System Uptime is reset. The SNMP
agent is restarted whenever you reboot the system, make an SNMP configuration
change, or enable/disable the SNMP agent.
Note: You can configure and administer SNMP trap destinations in both the
Configuration tab and the Administration tab of the Element Manager. This
allows operators who manage BCM50 faults to configure SNMP trap destinations
without having to access the SNMP settings on the Configuration panel. SNMP
must be enabled on the SNMP General panel if you want to configure and use
SNMP trap destinations from the SNMP Trap Destinations panel on
Administration panel.