


Chapter 6 Managing BCM50 with SNMP 145
BCM50 Administration Guide
To configure auto-SNMP dialout
1 Click the Configuration tab.
2 Open the Resources folder, and then click Network Interface.
3 Click the Dial-out Parameters tab.
The Dial-out Parameters panel is displayed.
4 In the Dial-out Number field, enter a phone number for the modem to use.
5 In the Dial-out Routes area, click the Add button and enter a route and subnet mask..
6 In the Static IP Address Pool area, enter a static IP address.
7 Select the SNMP page and select the SNMP Trap Destination tab.
8 Click the Add button and enter a destination IP address for the alarms to be delivered to.
9 Click OK.
For information about how to configure a dial-up interface as a primary connection for
auto-SNMP dial-out, refer to the BCM50 Networking Configuration Guide (NN40020-603).
Alarm severity levels
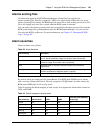
The terminology used for alarm severity levels in the Alarms panel and in SNMP traps is not the
same. Table 46 lists Alarms panel terminology and the equivalent SNMP trap type.
While the BCM50 fault management system denotes the source of an alarm as “ComponentID”,
the SNMP system denotes the sources of this information as a trap of source “eventSource”.
Note: If the line is busy or if the modem cannot connect for any reason, the alarm
will not be delivered to the destination. If you are using SNMP v3, the modem
will re-attempt the connection three times.
Table 46 Terminology used for alarm severity levels
Alarm Banner SNMP Trap Type
Critical Error
Major Error
Minor Warning
Warning Information
Information Information