


144 Chapter 6 Managing BCM50 with SNMP
NN40020-600NN40020-600
3 Click the Modify button.
The Modify Trap Destination dialog box opens.
4 Configure the Modify Trap Destination attributes.
5 Click the OK button.
The modified trap destination is displayed in the Trap Destinations table.
To delete a trap destination
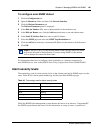
1 Select Configuration >Resource > Dial Up Interfaces.
The Dial Up Interfaces Panel apprears.
2 In the Dial-out Interfaces table, select the Automatic Dialout checkbox.
The Details for Interface panel appears in the lower half of the Dial Up Interfaces panel.
3 In the Details for Interface panel, click the IP Address Specification tab.
4 In the Remote IP Address Specification area, select the Assign IP address to remote
checkbox.
5 In the IP address field, enter the IP address of the ??? not sure.
6 Select Configuration > SNMP > SNMP Trap Destinations.
7 Click Add and add a destination IP address to which to deliver the alarms.
8 Click OK.
Auto-SNMP dial-out
The auto-SNMP dial-out service allows you to use an analog modem or ISDN channel to deliver
alarms to a specified destination.
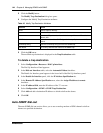
Table 45 Modify Trap Destination Attributes
Attribute Action
Name Enter a name for the trap.
Host Enter the IP address of the trap destination.
Port Enter the UDP port number from which the trap will be sent. The default
value is 162.
SNMP Version Select the version of the SNMP Agent for the trap. Options are: v1/v2C,
and v3.
Community String Enter the community string to use for the SNMP trap.
User Name For v3 only, enter the user name for the SNMP trap.