


3-50 Phaser 8400/8500/8550/8560 Color Printer Service Manual
Error Messages and Codes
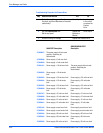
A2E Deskew sensor in unexpected state at ready.
1. Ensure ground integrity, see page 4-65.
2. Replace Tray 1 Pick Solenoid.
A2F Deskew Sensor in unexpected state.
1. Ensure ground integrity of the printer, see page 4-65.
2. Verify all doors and covers are fully closed and not moving during printing.
A2J Deskew flag sensor event during head purge.
A2K Deskew sensor in an unexpected state during a transfix roller oiling.
A2M The deskew flag tripped unexpectedly while picking paper from Tray 2.
A2N The deskew flag tripped unexpectedly while picking paper from Tray 3.
A2P The deskew flag tripped unexpectedly while picking paper from Tray 4.
A2S Deskew sensor in unexpected state during media stage for transfix.
A2Q The deskew flag tripped unexpectedly while picking paper from Tray 1.
1. Try using different, supported media.
2. Ensure the paper guides are snug against the media in the tray.
3. Push up on Tray {2 - 4} Nudger Roller until captured by the actuator arm.
4. Run the following diagnostic tests, Deskew Flag, Tray {2-4} Pick Clutch and
the Tray {2-4} Solenoid.
5. Ensure ground integrity of the printer, see page 4-65.
6. Verify all doors and covers are fully closed and not moving during printing.
7. Replace the Tray {2 - 4} Pick Clutch.
8. Replace the Retard Roller.
9. Replace the Preheater.
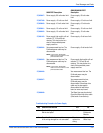
A3G
Deskew Sensor time-out during an auto Drum maintenance cycle.
A3M
The deskew flag timed out waiting for the paper picked from Tray 2.
A3N
The deskew flag timed out waiting for the paper picked from Tray 3
A3P
The deskew flag timed out waiting for the paper picked from Tray 4.
A3Q
The deskew flag timed out waiting for the paper picked from Tray 1.
1. Verify media is appropriate for the tray.
2. Verify the tray is not overfilled and the guides are positioned correctly.
3. Check for obstructions in the paper path.
4. Test the appropriate Tray Solenoid.
5. Test the appropriate Tray Pick Clutch.
6. Ensure the Take Away Rollers are in good condition.
7. Test the Take Away Roller using the diagnostic Paper Path Drive test.
8. Replace the appropriate Separator Pad.
9. Replace the Pick Assembly.
Jam Code Troubleshooting Procedures (Continued)