


Phaser 8400/8500/8550/8560 Color Printer Service Manual 4-59
General Troubleshooting
f. If the PE and PS indicators do not flash momentarily, the short is on
the printhead. Replace the printhead and retest the printer. Skip the
rest of this section if the PE and PS indicators flash because the
problem is elsewhere in the printer.
g. Carefully test the printer to ensure damage to the Electronics Module
did not occur due to the shorted printhead.
h. Plug in all cables removed during service.
i. Trace through all service steps performed to reattach any cables that
were unplugged during debugging.
j. Attach printer covers.
k. Perform full test of printer.
Printer Prints and the Display is Frozen With No Errors
N
o
t
e
Opening and closing the Front Door resets the Control Panel.
1. Electrostatic Discharge.
a. If the printer is currently powered on and frozen, open then close the
front door of the printer and see if the LCD responds.
b. If printer appears functional after operating the door, advise client that
failure may have been due to an ESD event. Thoroughly test printer
for any other problems.
c. Skip the rest of this section if printer now appears functional,
otherwise continue debugging.
d. With power cord connected, touch the metal Electronics Module to
discharge any static electricity. ESD damage to the printer may occur
if static electricity is discharged to printer electronics.
e. Turn off printer and wait 30 seconds for power supply capacitors to
discharge. Damage to circuits within the Electronics Module may
occur if the power supply capacitors are not allowed to fully
discharge.
f. Unplug power cord and remove printer's covers. Use caution around
motors, pulleys and live AC connections when working with the printer
covers off.
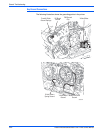
g. Examine printer for loose grounding connections, especially the
ground strap on the Y-Axis motor. Eliminate the possibility of internally
generated ESD from affecting printer.
h. Plug in all cables removed during service. Trace through all service
steps performed to reattach any cables that were unplugged during
debugging.
i. Attach printer covers.
j. Perform full test of printer.
2. Control Panel failure
a. Unplug the original Control Panel at connector ('C' / J220) and plug in
a known working Control Panel. This step checks for a keypad or LCD
failure in the Control Panel.
b. Plug in all cables removed during service. Trace through all service
steps performed to reattach any cables that were unplugged during
debugging.
c. Attach printer covers.
d. Perform full test of printer.