


Phaser 8400/8500/8550/8560 Color Printer Service Manual 5-39
Print-Quality Troubleshooting
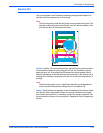
Gray Fill, Dot Size Uniformity
This print consists of a 66% black fill. It reveals thermal variations, transfix
roller pressure variations, or Drum oiling variations.
Look for: Large area of differences in the density across the width of the page.
(A slight variation is normal.) Look for a lighter vertical band, about 1/3 the
width of the page, running the length of the page. Also, look for small, light
spots, or irregular white lines, vertically aligned every125
mm (5.0 in.).
Also, look for ink on the top and bottom margin of the page, or ink on the back
of the page. This pattern is sensitive to the density variations in the paper it is
printed on. Use high-quality paper; otherwise, the print appears mottled.
Causes: Use the diagnostics to check the Printhead and Drum for correct
thermal regulation. Ensure the Drum Fan is running properly. A vertical band,
1/3 of a page wide, running the length of the page, is caused by a stuck
heating plate in the paper preheater. Run the Clean Print Smears procedure,
which raises the temperature of the paper preheater and may free the stuck
heating plate. Additionally, you may manually force a thick sheet of paper (65
to 80 lb.) through the paper preheater to jar the plate free. Light spots that
repeat every 11.63
cm (4.58 in.) down the length of the page are caused by a
defective transfix roller. The roller has a soft spot that is not pushing the ink
into the paper as well as the rest of the roller. If you observe variations in the
glossiness of the print, replace the maintenance kit.
If there is ink on the top and bottom margin of the page or ink on the back of
the page, it may be caused by the roller remaining down during the print. You
may hear an unusual noise if the Transfix Roller stays down and rubs against
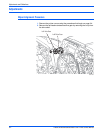
the Drum. Inspect the Drive Train and ensure that it self-homes between
prints. The drive train is in its home position when the two 1.5 mm holes found
on the clear plastic cover align axially with corresponding holes in the gear.
Another way to verify that the drive train is in its home position is to verify that
the two small leaf springs from the clear plastic cover are seated correctly in
their corresponding gear detent slots. Inspect the perimeter of the cam lobes
for surface defects and check to see that the angular orientations of the cams
match. Inspect the transfix load arm return springs. Verify that the
maintenance kit returns home between prints. Inspect the cam shaft surfaces
for damage. If all of these items are working correctly, replace the process
drive module.
s8500-053
Should see
Should see
even fill
even fill
left to right
left to right
Should see
even fill
left to right
Light band
Light band
Uneven fill
Uneven fill
Uneven fill