


4-64 Phaser 8400/8500/8550/8560 Color Printer Service Manual
General Troubleshooting
Verifying Power Supply Operation
The power supply is divided into two sections: the AC section used for heaters
and the DC section for control logic, Printhead drivers, and motors. Verifying
the power supply involves three steps:
1. Checking for proper AC voltage.
2. Inspecting the power supply fuses.
3. Testing for a shorted motor or solenoid, which shuts down the power
supply.
Measuring AC Power Supply Voltages
1. AC line voltages are present on the power supply and possibly in the
printer, via the heaters, while the printer is plugged into an AC outlet. The
power switch is detected by software; a proper shut down follows a power
off signal to the power supply. The printer may operate for a considerable
time after this procedure.
2. Turn off the printer, wait for shutdown, and unplug it from the power outlet.
3. AC Input: With a DMM set to measure AC voltages, measure the power
being supplied to the printer; it should measure between 90 to 140 VAC
(115 VAC nominal) or 180 to 264 VAC (220 VAC nominal).
4. Proceed to the step, “Testing Motor and Solenoid Resistances” below.
5. If a heater shorts, F2 or F3 opens. The power supply does NOT shut
down; however, a Service Required error code is displayed on the
Control Panel.
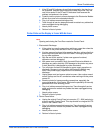
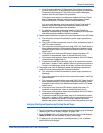
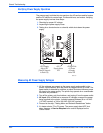
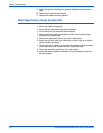
s8500-031
+50 V Supply
Active LED
(Take 20 Seconds
to Drain Off)
+3.3 V
Supply Active
LED
+15 High Side
+12 Power
+5 Supply
Active LED