


4-62 Phaser 8400/8500/8550/8560 Color Printer Service Manual
General Troubleshooting
a. Turn off printer and wait 30 seconds for power supply capacitors to
discharge.
b. Replace 525-Sheet Feeder.
c. Perform full test of printer.
Printer Does Not Print, LEDs are On and the Display is Frozen With No Errors
1. Nonspecific electronics failure.
a. Double check PS and PE indicators for any error code information.
The printer self test is usually able to detect a failure that would cause
this symptom. Looking up the error code may save debugging time.
b. If the PS and PE indicators are steady and dimly-on, replace the
Electronics Module, reassembly and retest printer.
c. If the PS and PE indicators are blinking, brightly-on, or totally off,
continue debugging. A dim but steady on condition indicates some
firmware was not properly loaded into a logic circuit.
d. With Power Cord connected, touch the metal Electronics Module to
discharge any static electricity.
e. Turn Off printer and wait 30 seconds for power supply capacitors to
discharge.
f. Unplug Power Cord and remove printer's covers.
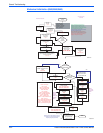
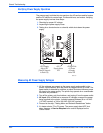
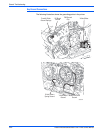
g. Unplug the following Electronics Module connectors:
■ Power Control to I/O Board (J800)
■ Power Control right (J400)
■ Printhead data (J130)
■ Wave Amp signal (J790)
■ Power Control left (J390)
■ Y-Axis motor (J280)
This step removes all other circuits so the Electronics Module can be
tested alone.
h. Plug in Power Cord and turn on power to the printer.
i. The PE and PS indicators should flash an error code reporting that
the Control Panel is missing. If the proper error message is not
flashed, replace the Electronics Module and retest the printer. If PE
and PS indicators flash, continue with debug.
j. Turn Off printer and wait 30 seconds for power supply capacitors to
discharge
k. Unplug the following Electronics Module connectors:
■ Power Control to I/O Board (J800)
■ Power Control right (J400)
■ Printhead data (J130)
■ Wave Amp signal (J790)
■ Power Control left (J390)
■ Y-Axis motor (J280)
This step prevents any faults from the motors, clutches and sensors from
preventing the I/O Board and Control Panel from functioning.
l. Plug in the I/O Board connector (P/J800) in the Electronics Module.
This step adds the I/O Board and Control Panel to the Electronics
Module.
m. Turn On power to the printer.