


CHAPTER 8 INSTALLATION
8–20
COPYRIGHT
©
1998 CANON INC. CANON NP7161/NP7160 REV.0 AUG. 1998 PRINTED IN JAPAN (IMPRIME AU JAPON)
LED1 LED2 LED3
2
1
LED5
LED6
LED4
IC6
SW1
SW4
SW3
6
1
BAT1
CN4
1
2
CN3 CN2
SW2
[22]
[21]
Figure 8-514
LED1 LED2 LED3
2
1
LED5
LED6
LED4
IC6
SW1
SW4
SW3
6
1
BAT1
CN4
1
2
CN3 CN2
SW2
[23]
Figure 8-515
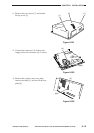
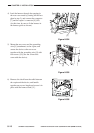
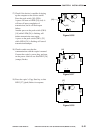
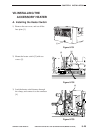
14) Connect the telephone line to the device.
If the device is connected on its own,
connect the modular jack cable to the
connector LINE [21].
If the extension function of the device is
used, connect the existing telephone or
fax to the connector TEL [22], and
connect the telephone line to the
connector LINE [21].
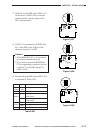
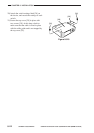
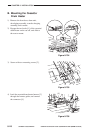
15) Call the service station, and request initial
settings for the device. (Upon reception,
LED4 [23] (red) will start to flash.)
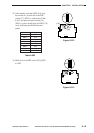
16) Call the service station to find out whether
the initial settings have been successfully
made. Otherwise, execute RAM clear
(steps 11) through 13) ) once again and
start over.
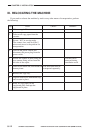
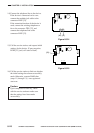
Caution:
Upon completion of each try, check
with the service station to make sure
that the settings have been made
successfully.